15-11-2023
Tag: guitar
06-01-2013
Hexapup samples, wiring and technical specs

Here are some wiring suggestions and sound samples for our ‘Hexapup’ hexaphonic pickups
Installation – Mounting the pickup
The hexapup is a standard humbucker size and will fit into most humbucker routed guitars without modification. Please note that the hexapup gives best results in the bridge position, and because it uses strong magnets it not really suitable for use as a neck pickup.
1. Mono pickup
When wired as a conventional mono pickup, the hexapup has a bright single coil tone. The coil arrangement means that it has very good hum rejection (humbucking) properties.
2. Stereo guitar.
The simplest way to connect the hexapup for stereo use is to mount two jack sockets into the guitar, and wire one side of the pickup to each jack. The signal can then be run to two amps or DI boxes for gigging or recording. There are two obvious ways to divide the strings, the pickup can be supplied in either split or spread mode, with spread being the default.
 |
| Split mode – low strings are sent to one amp, high strings to the other |
Split mode sends the low strings E, A and D to one channel, and the high strings G, B & e to the other, like Neil Young’s stereo guitar. Spread sends alternating strings to each channel, that is E, D and B to one output, and A, G & high-E to the other, which gives a nice spread of frequencies across the stereo image.
Here are some sound samples of the pickup in split mode. As always the stereo image comes across better on headphones than laptop speakers!
 |
| Spread mode – alternating strings are routed to each channel |
Here is one of the riffs above in stereo ‘spread‘ mode.
In each case the playing is a single guitar, and the recording was made using the DI input of API A2D preamp into protools, processed using Amplitube amp modelling plug-in.
3. Mono / Stereo Jack
An alternative way of wiring the output is to use a stereo jack and a stereo breakout box. If the stereo jack is wired so that the positive wires from both sides are wired to the tip, one negative wire to the ring and the other to the sleeve, then the pickup will also work in mono if a normal mono guitar cable is used.
4. Stereo guitar with Split / Spread switch.
On request, the hexapup may be supplied pre-wired with a switch to choose either split or spread mode. Here is an easy way of switching between the modes.
5. Full hexaphonic mode.
The hexaphonic pickup can of course be supplied with six pairs of output wires, which gives a vast range of wiring possibilities. Probably the simplest way is to use a 6 or 7 pin XLR socket for the guitar output, and run this to a breakout box wired to give six separate jacks.
The hexaphonic pickup can of course be supplied with six pairs of output wires, which gives a vast range of wiring possibilities. Probably the simplest way is to use a 6 or 7 pin XLR socket for the guitar output, and run this to a breakout box wired to give six separate jacks.
 |
| Heavily modified Jagmaster with hexaphonic and stereo outputs. |
When wired this way all six channels share a common negative path, which precludes phase or series / parallel switching of individual strings. However, having six channels without these options is usually enough to worry about! For our demo guitar we used this 8-core screened cable from Canford Audio.
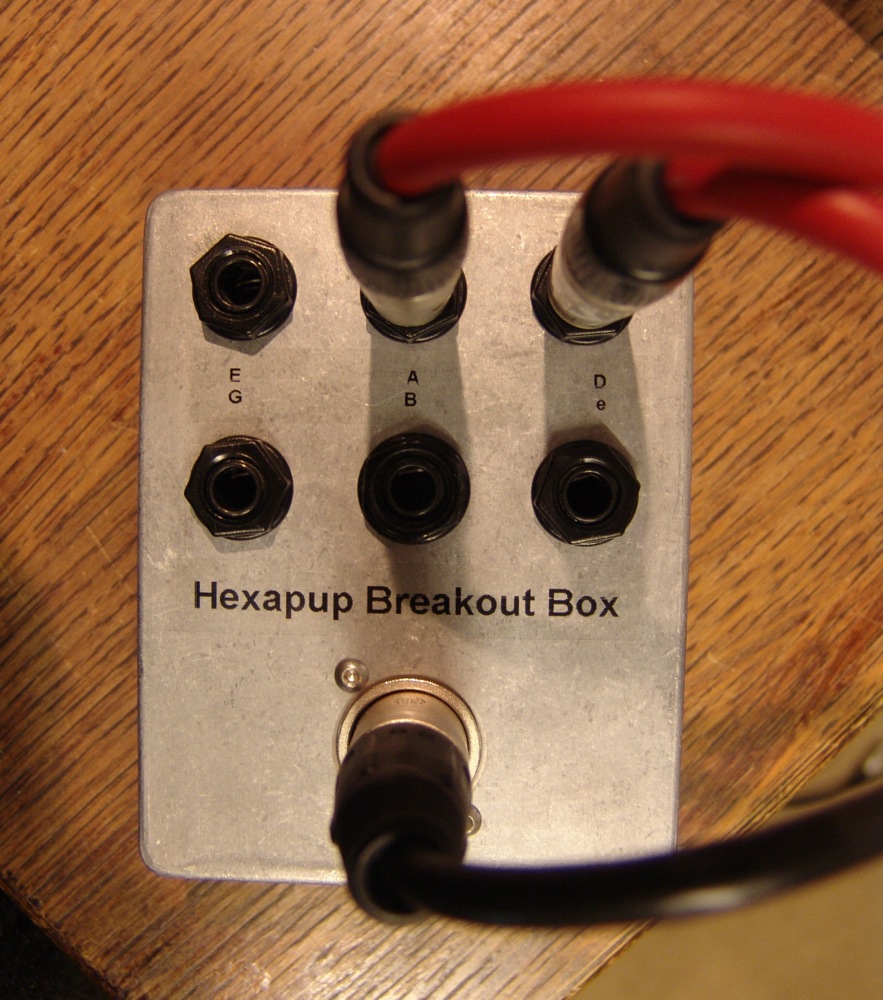 |
| Six channel breakout box for a hexaphonic guitar. |
Here is a sample recording made in hexaphonic mode, with the EA strings panned left, the top B and E to the right, and the D and G strings lower in level and somewhere in the middle. Different amp models (Amplitube) have been used for left and right.
There are some further sound samples of the hexapup in full hexaphonic mode here.
Xaudia Hexapup – Typical specifications
Dimensions
Fits in a standard humbucker route.
70 mm x 39 mm x 20.5 mm deep (25 mm including screw lugs)
Stereo model (3 coils in series)
DC resistance = 5.1 K ohms
Inductance @ 1kHz = 0.9 Henry
Wiring = Red & black, green & white.
Case ground = green/yellow
Red & green = positive, black & white = negative
Hexaphonic model (single coil)
DC resistance = 1.8 K ohms per coil
Inductance @ 1kHz = 0.31 Henry per coil
 |
| Rear of hexapup with six pairs of output wires |
Wiring. Output wires are silver plated, teflon coated.
Colour = positive, black = negative
E = Red & Black
A = Pink & Black
D = Yellow & Black
G = Green & Black
B = Blue & Black
e = White & Black
Case ground = green/yellow
More Hexaphonic pickup sound samples
 |
| Xaudia Hexapup |
A hexaphonic pickup lets you record you record the signals from each string separately, either through six amplifiers, or perhaps more sensibly by recording directly through instrument inputs or DI boxes. This gives a lot of creative possibilities.
For example, here’s a G major chord, played lazily from the low strings to the high. This was recorded directly into Protools, with the notes spread across the stereo width.
Adding an amp simulator gives it some body…
With a hexaphonic recording, it is simple to change the timing of individual strings. Imagine that we wanted the chord played tightly, rather than note by note. A quick edit and here it is…
Gmajor – all together
Or perhaps we would prefer to strum from the top to the bottom instead. No problem – we can just shift the notes slightly and we have it …
And by reversing the waveform of three strings and repeating the notes, we get this little ambient loop. A semi-reversed guitar
Now let’s get silly…
… we want to transpose part of a song, but the guitarist has gone to the bar. We can use Autotune on each track to pull each string up by two semitones to play an A major instead. Here’s how it looks on the screen…

And here’s how it sounds!
Auto-tuned Chord – Gmajor to A major
Of course we could have simply pitch shifted the whole chord up to achieve a similar effect – Autotune gives it an interesting glitchy slide texture as it chases the notes
By shifting the G-string up by one semitone rather that two, the chord becomes an A-minor. Now that’s something which can’t be done with simple pitch shifting!
Auto-tuned Chord – Gmajor to A minor!
The possibilities are endless!
18-12-2012
Quick-change guitar for pickup testing
One challenge when building prototype pickups is testing them quickly. It is easy enough to make the electrical measurements such as inductance, resistance and capacitance, but they don’t really tell you how the pickup is actually going to sound. Sooner or later they need to go into a guitar.
 |
| Squier by Fender Jagmaster ready for surgery |
Changing a guitar pickup isn’t a big job, but it still takes time. Usually the strings need to come off, the scratch plate removed, a bit of soldering, and then back together again before tuning. If you add a cup of tea then you can easily lose an hour.
So I wanted to make or modify a guitar to act as a workhorse for pickup testing, which would allow for quick pickup swaps without having to take the strings off. The obvious approach is to put the pickups in from the rear of the guitar – which means cutting a hole through a guitar and finding an alternative way to mount the pickup.

This Squier Jagmaster guitar makes a suitable victim for surgery. It was fairly cheap, the neck is straight and plays well, and the strat-style trem cutout means that I don’t need to remove a huge amount of wood.
The first job it to strip the Jagmaster down, removing the strings, scratch plate and the existing hardware from the front of the guitar, and the tremolo system from the rear. Then off with the neck to keep it safely out of the way when the jigsaw comes to play.

Once everything is out then I measured up and cut two aluminium rails that will act as mounts for the new pickups. These were filed round at the ends to fit the existing routing, and drilled and tapped for mounting.

Then came the dirty work. With a jigsaw I cut through the body to make a humbucker-sized hole. You can see just how thin the wood is between the pickup and the tremolo routings – just a few millimetres.

After the jigsawing, the hole was cleaned up with a wood file. The rails were then screwed into the body at the top of the guitar – the holes countersunk so that they don’t get in the way of the pickups.

One more job – the bridge no longer has springs to keep it under tension. A block of wood locks it in place instead. The guitar can now be put back together.
Now the pickup can be fitted from the rear with two screws attaching it to the aluminium rails. Screw terminals are also used to connect the wires to the output sockets for the ultimate quick change experience. A brass plate will cover the mess.
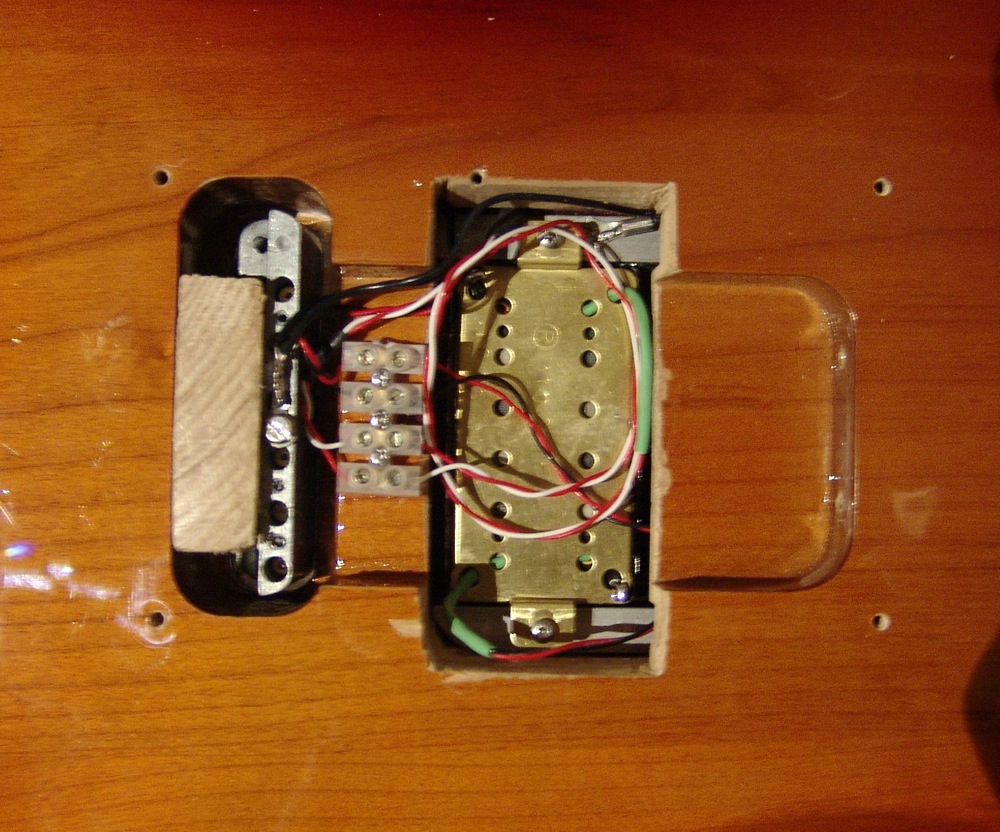 |
| Rear of ‘quick change’ Jagmaster with locked tremolo and pickup mount |
Now it takes two minutes to swap a pickup! Time for some rapid prototyping. And here’s the front of the guitar with a hexapup fitted from the rear.
 |
| Jagmaster with Xaudia pickup fitted. |
02-11-2012
The Trashcaster Lives!
Finally the Trashcaster guitar is finished. This started life as some parts on ebay – an old vox body and broken scratchplate, a Squire neck, hardtail bridge and knobs from a Jazz Bass. Add some paint and a pair of home-made pickups…. behold the Trashcaster!
 |
| Xaudia ‘Trashcaster’ guitar |
The Trashcaster has custom wound big single coil pickups, with coil tap and phase switches, a blend pot, and normal tone and volume knobs. Wiring the blend pot was fun. You have to get the turn direction right otherwise all of the sound disappears! With these controls the guitar has a wide range of tones, and the out of phase sound Nashville tone is definitely something unique!

I have strung this for Nashville tuning, which is the same as the high strings on a 12 string guitar. So when played along with a guitar in standard tuning, it fills in the holes and sounds a bit like a 12 string, but with micro timing difference there is more of a chorus sound to it. You have probably heard this effect on countless records without knowing it.

A couple of coats of clear lacquer helps the slide-on decal blend in. But perhaps I should have called it the ‘Nashmaster’. Too late now! The last job was to file the nut to take the narrower gauge Nashville strings, and to do this you really need a proper set of nut files. They are not cheap but I found these ones on ebay for around £40, and they did the job quickly and accurately.
17-10-2012
Trashcaster guitar (part 3) – Red or Dead
After stripping off the pink paint from my Trashcaster guitar, I found some traces of the original paint underneath. The guitar had once been a nice shade of fiesta red. I also found this photo of an old Vox Consort on the interweb…

I’m pretty certain now that my body started off as a Consort like the one above. It looks like someone cut down the pickguard, which was presumably damaged like the one in the photo.
After stripping and sanding back to the wood, I sprayed the body with several coats of red nitrocellulose lacquer from Rothko & Frost (who give an excellent service). These lacquers are nice to use as you can build up several thin coats in a day. The Trashmaster now looks rather smart!

The paint is just transparent enough to let a little of the grain show through. For a high gloss finish it should be given a few layers of clear lacquer, but I’m aiming for the less shiny look of budget 60s guitars so will probably leave it. The scratchplate is less than mint, and so a perfect body may look a bit incongruous. The replacement chrome control plate came from a Fender Jazz bass, adjusted slightly with a file to take off some pointy edges.

The extant screw holes in the body didn’t fit a standard neck plate, so I’ve used these ferrules and screws from StewMac. They work very well and solve the problem. Also, the original tremolo bridge was missing. I have replaced it with a used hardtail bridge from ebay (£6!), and machined a brass block to fill the hole where the vibrato spring must once have been. Perhaps that will give a little more sustain too.

Nearly done, and what the guitar needs now is a logo to stop the headstock looking quite so naked. Rothko & Frost also supply custom vintage style logos for a very fair price, and here is one that they printed for the Trashcaster. It now just needs a couple of coats of clear lacquer to protect it, and everything can go back together again.

10-10-2012
Trash-caster parts-caster guitar (part 2)
On closer inspection, the pink Trashcaster guitar had been painted over with a thick layer of what appeared to be household gloss paint.
 |
| Stripping a badly painted guitar body |
Sanding didn’t work well on this so I used some general purpose paint stripper to remove the paint and start again. Beneath the white were traces of some original red paint.
 |
| Yuck! |
A few layers of stripper and a scraper removed most of the paint. The result is a gory pink and white mess that looks like something from a slasher flick. Very suitable for Halloween!
09-10-2012
Trash-caster recycled Nashville guitar (part 1)
I have wanted a Nashville tuned guitar for some time, and saw an opportunity when I found a Jazzmaster / Jaguar style body and neck going cheap on a well know auction site. Time to put a guitar together! I’m calling this the Trashmaster (or Trashcaster?) as it is assembled from reused bits and pieces.
 |
| Hello Kitty? My pink guitar! |
The guitar parts arrived last week, and although the body and scratch plate looked in good shape, the neck was from a different instrument and played like a cricket bat! The body is a sort of vintage pink – not sure if I like it or not. Well, for £56 all in, one can’t complain too much.
I had a spare neck kicking around from last year’s Telemaster project, which played much better but didn’t quite fit in the body socket either. Judicial application of a plane, fret file and some abrasive paper quickly solved that problem!
 |
| Things almost fit together, but not quite! |
The scratch plate has two cut-outs for pickups and three switches, and covers most of the guitar’s routing. A metal plate from a Jazz bass covers the rest, and again this almost fits, and a hacksaw and file made some unwanted corners disappear.
The pickup holes are also slightly bigger than standard Strat or Tele single coils, and so custom pickups were made. This was pretty simple – using flatwork boards from StewMac, I cut out boards for the top and bottom of the bobbin, and drilled to make room for the magnets. This board is pretty useful stuff – it feels like cardboard but works like plastic. It drills easily and can even be turned on the lathe!
 |
| Custom pickups made in the Xaudia workshop |
The board was the glued to Alnico 5 magnets, and then the bobbin wound with 42AWG wire, and finished with string before potting in the wax bath. I put 9350 turns on the first pickup, but suffered a wire break about half way through making the second. Problems can often be turned into opportunities, and so in this case I ended up with a tapped 5000+5000 turn pickup for the neck. I have also been scatter-winding, so this should be interesting!
 |
| Wiring the guitar with scratch built pickups |
The switches on the scratch plate can thus be used for phase and coil tap duties. Try to be neat with the wiring!
 |
| Fender-looking Trashcaster, and Telemaster |
So, time to put the guitar for a bit together for a moment and see how it looks. Not too bad, but I’m not so sure I need a pink guitar in my life! More here….
15-06-2012
Reverend Stereo Slingshot!
Here is my much abused Reverend Slingshot, now complete with a properly mounted stereo pickup.

The nice people at Reverend guitars sent me a NOS white scratch plate with routing for 3 P90s, which is perfect for mounting the new pickup alongside the two standard P90s. All I needed to do was drill out a hole for a second output jack.
The open chrome pickup cover was made by modifying a covered one, using a dremel cutting wheel.
It looks (& sounds) pretty awesome!

02-06-2012
Stereo hexaphonic pickup prototype
I have been thinking for some time about a stereo guitar that would spread out the signals from the different strings to a pair of amplifiers, or to stereo inputs for recording. So here is my first attempt at winding a stereo pickup.
In order to get some separation between the strings, I decided to make six mini-pickups and combine them into sets of three. Here are the parts – six bobbins, six steel pole pieces, an Alnico 5 bar magnet, and a home made top board.

Each was a coil of 5000 turns 42 AWG enamel wire, around a steel bar. Three of the coils were wound normally and three reverse-wound as they will sit on magnets of reverse polarity.
 |
| Winding mini-pickups on the Meteor winder |
These were then arranged in two sets of three, magnetised by a bare of Alnico 5. The hard part is keeping track of the winding direction, the start and end of the wires, and the magnet polarity – so that everything is in phase! Each set of three coils were wired in series, and the E,D & B strings sent to one output, and A,G & E sent to the other. Once done, the parts were glued in place, soldered, and then dipped in the wax bath.
 |
| Assembled six-coil pickup with magnet |
And then it was mounted in the test guitar – my trusty Reverend Slingshot, with the pickup simply taped in place for a test run. The next job is to mount it properly and put a cover on to hide the mess – the hard bit was finding an undrilled P90 cover, but ebay came to the rescue.
 |
| Reverend Slingshot with prototype stereo pickup |
So, how does it sound? Here is a little run on the guitar and the screenshot from protools. The recording was made into the instrument input of an API A2D, using the digital output at 24bit, 96 kHz into protools. Then no further processing, other than bouncing to 44.1 kHz, 16 bit.
[The stereo image of laptop speakers is usually pretty awful, so best checked out on headphones!]
As always, the stereo is much better on the .Wav version (5 mb…)

The isolation between the two sets of strings is actually very good – you can hear and see on the screen shot that the two channels are very different, following the two sets of strings. It gives a nice interesting stereo spread with the run on the B-string being panned to the right, and the lower notes played on the A string going left.
Another stereo example is here, along with the separate left and right components.
I imagine this would be good for double tracked guitars with big Pete Townsend style chords – using two amps. Although this is wired for stereo, it could easily be made into a hexaphonic* pickup. I’m not sure what use that would be in the real world, but it would certainly be fun to find out.
Update: Here is the pickup mounted properly in the Reverend guitar
Footnote
*The concept of a hexaphonic pickup is by no means new. The earliest patent reference that I could find to the word ‘hexaphonic’ is in this application by Gibson filed in 1990. This refers to midi pickups and states “The first category usually makes use of a special pickup which is mounted on a normal guitar as is the case in the present invention It is deemed important to retain the guitarness or feel of the instrument and a retrofittable hexaphonic magnetic pickup is utilized….” So the idea of hexaphonic pickups was well understood by that point, and in fact must have been obvious even to the very first pickup winders.
Digging deeper I found this article on polyphonic pickups, in Premier Guitar magazine, which covers the subject in better detail than I ever could.
And here is a story from the Gretsch website about Chet Atkin’s stereo guitar from 1956, which used a split coil to send the three bass strings to one side, and the three treble strings to the other. They applied for patent in 1956, and this was granted in 1960.
20-02-2012
‘Yorkshire Tour’ Stratocaster pickups
I spent Saturday helping my former band-mate Ant make new pickups for his 1983 Fender Stratocaster – the stock pickups were OK but lacked a little warmth, and he wanted something overwound (i.e. more turns than a ‘standard’ strat pickup), to give a hotter, fatter sound inspired by Rory Gallagher’s ‘Irish Tour’ album.
 |
| Ant makes single coil pickup formers from board and magnets. |
Magnetic fields fall away rapidly with distance, and with a moulded plastic bobbin, there is inevitably a gap between the pole piece and the coil. Instead, we made the pickups in the traditional manner, with board and Alnico-V magnets supplied by the mighty StewMac.com. Although it takes a little time to construct the pickup in this manner, this method does give a better sound, as the copper wire coil is wound directly onto the magnets, with the most intimate contact possible.
 |
| The old strat pickup assembly removed |
We made a couple of small tools to help with the assembly. A pair of acrylic blocks were cut to act as spacers between the top and bottom of the pickup, to keep the boards parallel. One of these was drilled to help align the magnets as they were knocked into place. The other tool was a spindle for the coil winder.
 |
| Knocking in the magnets – a strip of wood protects the magnet from the hammer! |
Once the three bobbins are assembled and glued, it is a simple case of winding the required number of turns onto the former without breaking the wire! The neck and mid pickups were wound with 9000 turns of 42 AWG plain enamel copper wire, and the bridge pickup with 9800 turns, which gave DC resistances of 6.7 kΩ and 7.4 kΩ respectively. 7.4kΩ indicates that around 1300 meters of wire has been wound onto the pickup! For comparison, according to Vintage Guitars Info, the original Stratocaster pickups measured circa 5.8 kΩ to 6.3 kΩ.
 |
| An assembled pickup – magnets and flatwork – on the coil winder. |
It was interesting to see how the original pickups were wound – they are pretty inconsistent, and one in particular had substantial asymmetry to the coil. Perhaps there is some magic to this, but we suspect that it was just their winder drifting out of alignment and piling up the wire on one side.
 |
| Fender Stratocaster pickup, circa 1983. |
Our pickups were a bit neater than that! Once wound, the lead wires are soldered on, and the complete pickups are dipped in the wax bath to stop microphonics, and then magnetised. A pair of very powerful 1 inch circular neodynium magnets were used to magnetise the Alnico 5 pole pieces, and we measured around 900 to 1100 gauss for each of the poles. The middle pickup was reverse wound, and given a reverse polarity, by simply flipping the bobbin over for the winding and magnetisation processes. This gives some humbucking when the mid-positions are selected.
The verdict? “Those pickups are PHAT!! Awesome. Loads more bass!“
 |
| Back together again – Stratocaster heaven! |
05-01-2012
Fender Telemaster build
My holiday project was assembling this Telemaster guitar, from parts acquired that I have accumulated over the past six months or so.
 |
| Fender (ish) Telemaster guitar, Xaudia |
The ‘Telemaster’ is an imagined product that Fender might have made in the 1960s or 70s, but never did – it is essentially a Jazzmaster body with Telecaster hardware. In this case I used a neck with a Strat-style headstock, and added a Fender-badged Bigsby vibrato, simply because I love the Bigsby sound.
The ash body & scratch plate were made and sprayed by John Manuel of Carlisle, who did an amazing job with a nitrocellulose transparent white – it really shows the lovely grain below. He can be contacted through ebay.
The neck and locking tuners were from Vanson guitars. The neck is pretty nice quality, although I did need to rub it down with some very fine abrasive paper to remove a couple of rough spots in the varnish. I found it slightly chunkier in profile than an original Jazzmaster neck.
 |
| Bigsby with super-tremola upgrade |
One thing that I don’t love about Bigsbys is re-stringing them. The ball ends of the strings have a tendency to slip off the metal posts, which can be very frustrating, and one really needs four hands for the job – to hold the string at both ends, keep in under tension, and turn the tuner! Two things help with this – firstly locking tuners clamp the string at that end, and also I have fitted a Duesenberg super tremola kit, from Rockinger, which replaces the posts with a through-hole system. Much less frustrating!
 |
| home made telecaster pickup |
The pickups are of course home made, and I tried to get as close to the original Telecaster specs as I could. Rather than using a bobbin/former to wind the coil, the core of the pickups were made using top and bottom ‘flatwork’, glued to Alnico rods. Enamelled wire was then wound directly onto the magnets, which avoids the gap between magnets and wire that is inherent with a plastic former.
The bridge pickup was wound with 8500 turns of 42 gauge wire, and the bridge was reverse-wound with around 6500 turns of 43 gauge, and of course reverse polarity for the magnets. Once wound, the pickups are wrapped with string to protect the delicate coil, and then dipped in wax to stop microphonics. The whole thing is very solid, and rather heavy.

I did briefly consider adding a headstock decal to complete the fake Fender look, but decided that it was too good to give anyone else the credit – so it has a nice Xaudia badge. I am rather proud of it! 🙂
02-01-2010
Framus Television
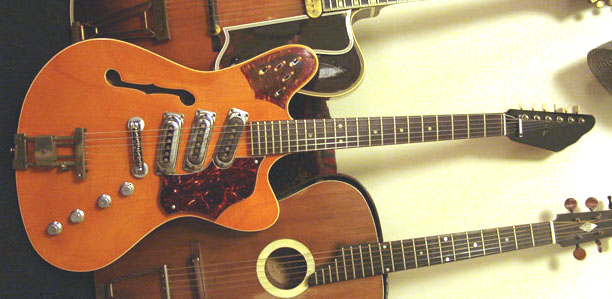 |
| Framus Television |
It is quite sad to think that the success of the big American guitar manufacturers (F–, G–, you know who you are!) led not only to some excellent instruments and high standards of construction, but also to the demise of several smaller builders of quality guitars. Cheap imports from the East added to the problem. One such victim was the German manufacturer Framus, who went bankrupt and ceased production at the end of the ’70s. (The company has since been reborn).
Framus made guitars of generally high quality with some interesting features. Here is a 1968 Framus Television semi-acoustic, the shape of which is clearly influenced by Fender’s Jaguar/Jazzmaster (or was it the other way round?) . It has a pleasing asymmetry, with a single f-hole (as far as we can tell, most Televisions had two), three pickups, and a tremolo. The headstock shape is whacky – like a big hand – but we like it. Colour of this one is a beautiful stained carrot-orange-yellow, rather like certain Gretschs – we think they call this ‘aniline yellow’. It has a laminate top and back.
This guitar arrived on the bench with toggle switches in place of the original sliders, as well as a couple of loose wires, which we of course replaced/fixed. The circuit is slightly unusual (which is why it is on this website at all!), so we’ve sketched a circuit diagram to help other owners.
 |
| Framus Television circuit |

The circuit consists of two parallel output stages each with volume and tone pots (marked T&V in the diagram) , which the player may use to switch between ‘rhythm’ and ‘lead’ settings. This approach predates the days when everyone has booster pedals on the floor, and similar systems are also found on Jaguars and Jazzmasters. In the ‘rhythm’ position, only the neck pickup is active. In the ‘lead’ position any combination of the three pickups may be switched on – the pickups in combination give some audible phase cancellation. There is also a bass cut filter switch. A summary of the switches:
S1 = Bridge pickup on/off
S2 = Middle pickup on/off
S3 = Neck pickup on/off
S4 = Bass cut (lead circuit only)
S5a = Sends neck pickup to rhythm or lead tone/volume circuit.
S5b = Switches between lead and rhythm tone/volume circuits.
As the tone and volume pots are tricky to remove and function well, they were not investigated or measured for value. I think they are just standard.
There’s a good chance that the circuit is similar to Strato Delux models of similar vintage, which also have up to 5 switches. Do let us know if you can confirm or deny this.