15-07-2024
Tag: transformer
11-01-2015
Shure Unidyne 545 transformer bypass switch mod.
I have read a few posts on internet forums wherein the transformer is removed from Shure mics such as the SM57. This will inevitably reduce the output level and also reduce the impedance to that of the capsule alone, and will of course remove any chance of overloading the transformer! Which means that the result is a quiet mic with low output, perfect for putting close to a drum head.

I decided to try it out. I had a Shure Unidyne 545 with a faulty transformer, so I took that out and wired the capsule directly to the output socket. The result was absolutely ideal for close-micing snare drum.
One of my regular customers asked about making this into a switchable feature. Well why not? With a double-pole double-throw switch it should be possible. The only challenge was finding a switch small enough. In the end, after trying several brands, I found that a spare switch for a Fender Jaguar would fit… but only just!

Firstly the capsule needs to be removed, unsoldered and new wires attached to the capsule. I also ran new wires to the XLR socket to be safe. The mic is filled with quite a lot of sticky brown gunk so that slows down the work.

The trick is to fit the switch from the outside of the microphone, and so the wires need to be fed out through the switch slot. It looks a mess in this state, so they are trimmed back to roughly equal length and soldered to the switch, and it all goes back together. I marked the transformer position with an X. (‘Trans’ in Latin can mean ‘cross’ or ‘across’, and X is a cross!).

Here is my sketch of the circuit, with the capsule on the left and the XLR on the right. Note that the black and white transformer wires are a high impedance winding and are not used in this circuit. Transformer wire colours may vary for other models and examples, and need to be checked before starting work.

The final job is to check the polarity of the mic against a known reference. If it is out of phase then the wires need to be swapped either at the capsule or the XLR socket.
With the transformer bypassed, the mic measures around 15 ohms at 1 Khz. The transformer brings this up to 200 ohms, and increases the output level by 10 to 12 dB. but also introduces a little bass cut. The plot below shows the difference the transformer makes. I am uncertain if the bump at around 800 Hz is real.

With the transformer bypassed, the mic can be placed close to loud sources and there is also a bass proximity effect, so the mic sounds really nice and fat!
Thanks to Lee Mouatt.
22-07-2014
Transformer boxes
Here are our updated transformer boxes, looking smart with a new metal badge and hammertone paint. They come in a rugged metal box with Neutik XLR connectors at each end for easy use.
These little gadgets are perfect for interfacing old 30 and 50 ohm microphones to modern equipment that expects to see 200 to 600 ohm microphones, and can give an increased output of up to around 12 dB, which is welcome for older ribbon mics.
They are available in a range of ratios, and our most popular model is the 50 Ω to 600 Ω box, which is ideal for Melodium 42B, STC 4033, and Western Electric / Altec 639 ‘birdcage’ microphones.
These can be supplied to order in almost any required ratio to match your microphone.
05-11-2013
Upgrades for B&O microphones.
 |
| Bang and Olufsen BM3 ribbon mic |
Regular readers will be aware that I am a big fan of B&O microphones, and have serviced quite a few of them over the years. Whilst these mics are stylish and look great, the output levels can often be disappointing, restricting use to sources like guitar amps and drums. The low sensitivity is usually due to weak magnets and the fact that the early microphones have an output impedance of 50 ohms – an older standard. With some work we can make these handsome microphones sound as good as they look.
 |
| B&O BM3 deconstructed |
Firstly, a replacement transformer can be used to convert the microphone’s output impedance. The stock transformer in the early BM2 and BM3 microphones has a ratio of about 1:20, and with the thick wide ribbon gives an output impedance of 50 ohms. Switching to a 1:40 transformer will give an increase of 6dB and raise the impedance to about 200 ohms – Xaudia make such a replacement. With a thinner and lighter replacement ribbon, the output and impedance will both be a little higher.
 |
| New magnets! |
We also commissioned a batch of custom magnets for BM2, BM3 and BM4 microphones* which greatly increase the magnetic field, and therefore the output level. The magnets in an old BM3 typically have a field strength of 1000 to 1600 Gauss, whereas the replacements give a field of around 6500 gauss – a three or even four fold increase in magnetic field strength, which translates, at least in theory, to a 9dB to 12dB increase in output.
Here are some frequency response plots from three B&O BM3 microphones.
 |
| B&O BM3 with new ribbon (blue), new transformer (green), and new magnets (red) |
Red = new ribbon, upgrade transformer, new magnets.
Green = new ribbon, upgrade transformer, stock magnets
Blue = new ribbon, stock transformer, stock magnets.
With the full upgrade, the output level is raised by about +18dB, which transforms the mic into a much more versatile recording tool that can be used for acoustic instruments as well as the usual louder sources. If your B&O mic needs a new ribbon, then it is well worth considering a magnet and transformer upgrade at the same time.
*We have similar magnet upgrades for the BM5 and BM6 mics.
27-09-2013
A few thoughts about ribbon mic transformers… part 1
 |
| Film industries ribbon mics |
When describing ribbon mics on this blog, I often note the output impedance of the mic, and possibly the transformer ratio too. Occasionally I receive messages asking how the impedance relates to output level, so here I will try to outline the role that the transformer plays in a ribbon mic. A ribbon mics is a very simple device, and if we consider how it works we will see just how important the transformer is.
In the beginning…. Let there be mics!
If we place a thin, light strip of corrugated aluminium* foil in a magnetic field, it will move in response to sound waves, and, just like an alternator, will induce an electrical potential that oscillates with changing velocity. We have a ribbon microphone!
 |
| Tannoy mic – ribbon, magnets and transformer |
But to get a useful signal out of the ribbon, we must complete the circuit and connect it to something. Because the voltage of the signal is too low to connect directly to a mic preamp, a transformer is used to increase the output to a more usable level**. So far so good, but what kind of transformer do we need? That depends on the destination of the signal and how far it has to travel to get there.
The Good Old Days
In the early days of sound recording with ribbon mics, the destination would usually have been a tape recorder of some kind, with a tube preamplifier to receive and boost the signal from the microphone.
In the early days of sound recording with ribbon mics, the destination would usually have been a tape recorder of some kind, with a tube preamplifier to receive and boost the signal from the microphone.
The mic could be connected in two ways: the budget option would be a high impedance connection using an unbalanced screened cable through a capacitor and straight to the tube grid, just like a guitar! The drawback is that unbalanced, high impedance connections are prone to picking up noise, and parasitic capacitance will limit the length of cable that can be used before the higher frequencies become significantly attenuated.
A better approach is to use a balanced cable to a second transformer in the preamp. The balanced connection will give better rejection of noise and long cable runs can be used. With 30 to 50 ohm microphones it is possible to run cables for hundreds of meters, which was ideal for broadcast and film recording. For these reasons the early impedance standards for microphones in the UK were 30 to 50 ohms for professional use, and high impedance for consumers. Broadcasters in other countries had different standards which just compounds the confusion – for example many Japanese microphones are 600 ohms.
The impedance can be set using the output transformer: Let us make an imaginary ribbon microphone for some thought experiments! In our imaginary microphone, the ribbon in the magnetic field might produce a signal of 1 mV for a given sound level, and the aluminium itself might have an impedance of 0.2 ohms. But the transformer primary winding also has some resistance, and that would add another, say, 0.1 ohms to the impedance of the primary circuit to give a total of 0.3 ohms.
 |
| Film Industries transformer dissected |
So we will make the transformer with a 1:10 ratio. This increases the impedance by a factor of the ratio squared, so in this case we need to multiply our 0.3 ohms from the primary circuit by 100, which gives 30 ohms. The secondary winding also has resistance, which might be of the order of 2 ohms, and we need to add that in. So overall we have a 32 ohm impedance for our microphone, which is suitable for older 30/50 ohm equipment.
What about the output level? The 1mV signal is multplied by the transformer ratio, so we now have 10 mV output, which equates to a 20dB increase in signal.
This Is The Modern World
Over the decades, broadcast and recording equipment has become more standardised, and most modern mixing desks and dedicated mic preamps are made to work well with microphones of up to around 600 ohms.
Ribbon microphones tend to have low outputs compared to modern dynamic and condenser mics, so it is advantageous to squeeze out as much level as we can. So, let’s go back to the transformer in our imaginary ribbon mic and re-design it for use in the today’s recording environment. We can keep the same primary winding, but change the secondary winding to one with a higher turns ratio.
| Xaudia ribbon mic transformers being assembled |
Let’s make it a 1:32 transformer, so now we need to take our 0.3 ohms from the ribbon and primary winding and multiply it by 32 squared, which gives 307 ohms. Once again we need to add the resistance from the secondary winding – in this case the wire is not only longer from the extra number of turns, and also will be thinner because we have squeezed the extra turns into the same space. A typical value would be 20 ohms, which would give us 327 ohms altogether, which most modern preamps can cope with quite happily.
Our output level will now be 32 mV, or 30dB gain with respect to 1 mV. So we have an improvement of +10dB over the 32 ohm transformer.
No Free Lunch
In life, and in physics, we know that you don’t get something for nothing. So are there any drawbacks with increasing the ratio. The higher impedance can increase the resistance noise, so it is important to make sure that the transformer is well designed with a very low DC resistance, particularly for the primary winding. However, the extra 10dB could be the difference between asking 50 dB gain from the preamp, or cranking it up 60 dB gain, where many preamps are becoming noisy.
Ancient and Modern
In most cases, it is worth getting the transformer right and demanding a bit less from the preamp. With vintage ribbon microphones it is very often possible to re-wind the original transformer to a higher ratio to get more output from the microphone. If the original laminations and winding style is used, the vintage tone of the mic can be retained, and overall this can give a stronger signal and a better signal-to-noise ratio into modern equipment.
| Vintage Ferrograph and Wearite matching transformers |
Another option is to use an impedance matching transformer. Back in the 1950s and 60s, most manufacturers of ribbon mics sold transformers to solve all kinds of matching problems. One example is this line matching transformer from Reslo, which connects a low impedance mic to a high impedance tape recorder. Xaudia make impedance matching transformer boxes with XLR fittings to do exactly the same job in a modern studio.
In part 2 of these ramblings I will discuss the effects of the transformer’s inductance and resistance characteristics.
*Usually corrugated, and usually aluminium!
** Almost always. I have seen one example of a transformerless ribbon mic, but it is a crazy design!
13-06-2013
Cadenza Mic Transformers and Mounts
Xaudia now supply drop-in upgrade transformers for Cadenza ribbon microphones.
 |
| Xaudia transformer (left) and original Cadenza tranny |
The original transformers had a tapped winding made to give an output impedance of either 30 ohms or high impedance, neither of which is ideal for interfacing with modern equipment. Our upgrade transformer gives an output of 300 ohms with a good original ribbon, which gives about +10 dB compared with the 30 ohm connection. It also has a lower DC resistance and noise floor.

The transformer is supplied in a mumetal shielding can of the same dimensions as the original, and slots into the base of the mic below the motor assembly, as shown.
 |
| Cadenza on a stand! |
And here is a funky adapter that we made for a customer, to mount his Cadenza onto a normal mic stand. It recycles the plastic connector and locking ring from the original tripod mount.
 |
| Cadenza mic stand adapter |
*Or other impedance values on request.
17-01-2013
Reslo LMT line matching transformer manual

Here is a scan of the manual for the Reslosound LMT series of line matching transfomers. If you have one, it might be useful! Many thanks to Lee Ackerly for sharing this.
Edit: link fixed 2nd March 2014
16-01-2013
Reslo LTU1 line matching unit manual

When home recording with reel-to-reel tape machines was a popular hobby, back in the 1960s and 70s, many recorders had only high impedance inputs. However, the low impedance microphones of the time could be used with a longer cable without signal degradation, and so most manufacturers offered matching transformers to plug that gap.
Other transformers were also available to match medium and high impedance microphones to low impedance inputs, and so on. But the Low-to-High is by far the most common.
Here is a scanned manual for the Reslosound LTU1 line matching unit, which was used to connect 15Ω to 50Ω ribbon microphones to a high impedance tape deck. This was superseded by the LMT, which is essentially the same thing in a smarter metal can.
 |
| Reslo impedance matching transformer. |
07-11-2012
1934 RCA PB90 ribbon mic time capsule
Look what’s on the bench today….
 |
| RCA PB90 ribbon microphone from 1934 |
This is a beautiful RCA PB90, in complete original condition, but need of a little loving care to bring it back to its former glory. Here’s the output transformer….
 |
| RCA PB90 Ribbon mic transformer, 1934 |
It’s date stamped 21st September 1934! 78 years old. The mic shares a birthday with Leonard Cohen!
That’s amazing.
29-09-2012
MOTM Reslo SR1 studio ribbon
 |
| Reslo SR1 studio ribbon microphone |
This month’s MOTM is the Reslosound SR1 Studio microphone, which was a big brother to the RB models, and was Reslosound’s top of the range ribbon microphone. They are nice sounding figure-8 ribbon microphones, and are very much less common than the RBs, and have become quite desirable amongst collectors and studio engineers. Often they came in a stunning bronze colour with matching plug, like the one above.
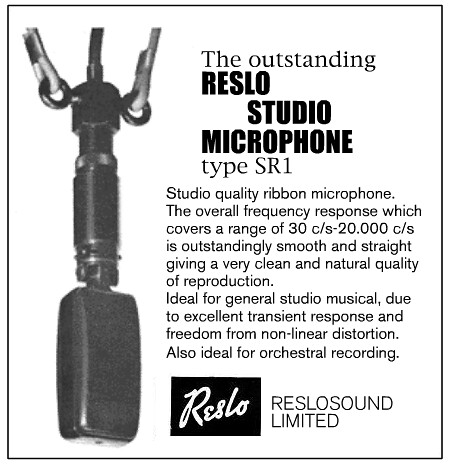
The advertising at the time claimed 30Hz to 20kHz – although doesn’t qualify that with a dB range.
 |
| Reslo SR1 (top) and RB microphones |
Extra sensitivity comes from using a longer ribbon and an extra magnet, and the mic is consequently about 1/3 as long again compared with the more common RB. By necessity the SR uses a different ribbon frame from other Reslo microphones. The mic below came complete with its original fibreglass stuffing – which protects the ribbon, damps any ringing of the shell, but seems to muffle the sound a little.
 |
| Inside the Reslo SR1 |
 |
| Reslo SR1 output connector |
The RB microphones are quite notorious for grounding problems, as the mic body is only grounded through mechanical contact at the plug. The SR1 deals with grounding in a better way. The output socket has a hole drilled in the centre with a small wire pushed down and soldered to one of the lugs (see photo, by the green wire). When the mic is reassembled, the long screw that secures the connector makes firm contact with both the mic body and the central wire, giving a good solid ground. This works well, and I now use this approach to ground troublesome Reslo RBs too.
 |
| Reslo SR1 transformer, being re-wound |
 |
| winding arrangement for SR1 transformer |
The SR1 was available in both 30/50 ohm and 250 ohm versions, and used the same laminations and bobbin as the later RB transformers, but with a more sophisticated winding configuration. The SR1 transformer has a 5-winding construction, with two primary windings alternating between three secondary windings.
We can supply reproduction SR1 transformers on request.
Thanks to David Pumple for sharing photos and information. The SR1 advert is from http://reslosound.blogspot.co.uk/.
27-06-2012
Beyer ribbon microphone transformer
This transformer came out of a faulty Beyerdynamic M260.
 |
| Beyerdynamic M260 transformer |
The mic was giving no output, but the ribbon was OK. The problem turned out to be a short in the primary winding, which gave an excuse to take a peek inside.
I was surprised how roughly the primary coil is wound – it really looks like it has been done by hand. Perhaps it is to minimise parasitic capacitance, although that is not usually such a big problem with low impedance windings as they only have a few turns.
In this case the short was located and the original transformer was repaired, but that is not always possible, and sometimes a rewind or replacement is required.
Some of the Beyerdynamic ribbon mics, such as the M500 and some models of M260 have a ‘built in’ high pass filter. This is done by manipulating the transformer inductance, allowing some of the bass frequencies to pass to ground. Some people like this, but others (including myself) prefer a full frequency response.
 |
| Xaudia B-series (top) and Beyer transformer (below) |
Xaudia now produce replacement full-range transformers for repair or upgrade of Beyer and B&O mics. The B-series transformers use a larger core than the originals, but still fit neatly inside the mic. They can be supplied in any desired ratio, and have lower DCR specs than the originals, which gives better noise performance too.
08-06-2012
Upgrade Transformers for Reslos
Those who follow this blog may have noticed a certain amount of Reslo-related activity….
 |
| Xaudia R-series transformers – Reslo upgrades & repairs |
Our new Reslo upgrade transformers are the result of this work. They are made here in our workshop in York, UK using high quality German laminations and teflon insulated silver plated lead-out wires.
They outperform the original Reslo units in terms of resistance noise and frequency response, giving less noise, an extended bottom end, and better impedance matching into modern equipment.
Typical Characteristics
Primary DC resistance 22 milliohms.
Primary Inductance >620 µH at 1KHz, >2.0 mH at 100Hz.
Frequency range <20Hz to >65 KHz.
Ratio 1:32 (available in 1:12 to 1:40, as required).
28-05-2012
Reslo RB 30 ohm & Hi Z mic wiring
Some Reslo RB mics have a transformer with a split secondary that gives the owner the choice of either a 30 ohm or high impedance output. Often these mics get dismantled and rewired, so here is where the internal transformer wires go….

For a 30 ohm output, yellow is the ‘hot’ output, and should eventually end up at XLR pin 2. White is cold, and goes to pin 3.
The green wire should not be grounded, but this sometimes happens by accident if the plug uses one of the pins for ground. The result is a high impedance path to ground from the output, which can act as a filter and give a weak output and weird frequency response.
Update May 2021
One reader reported that his microphone was reverse polarity after following this wiring diagram.
It is always a good idea to check polarity after any repair or modification. The polarity can be corrected by simply swapping over the two transformer output wires.
25-05-2012
Reslo Black & Red Labels continued…
Last month I wrote a post discussing reslo microphones with red and black labels, and spent some time describing the transformers inside. Since that post I have measured more transformers, and the larger data set is beginning to show some definite trends.
 |
| Transformers from Black label mics – type 10202 |
Perhaps the most revealing transformer characteristic is the primary inductance. The DC resistance is also important in terms of noise, but seems pretty consistent across the measured transformers – usually around 50 mΩ for the primary and 1.2 ohms for the secondary. DC resistance should depend on the thickness of the wire and the number of turns used for the winding, and this seems to be common to the transformers although occasionally the leads may become oxidised.
Measuring the inductance is a little hazardous as it is dependent on the frequency at which the measurement is made. For most of the transformers I have measured at 1kHz and also 100 Hz, but the first few were just measured at 1kHz. The inductance at 100 Hz is usually around 3 times that measured at 1KHz.

The graph shows the measured inductances at 1kHz and 100Hz when available (circles). The transformers marked with crosses were just measured at 1kHz, and the 100Hz value extrapolated from behaviour of the others.
Another way of looking at the transformer data is the relative cut-off frequency (fc) – the ribbon and transformer primary winding form a high pass filter. Assuming the ribbon has an impedance of about 0.3 ohms, then we can calculate fc. We use the value measured at 100Hz as this is closer to the frequencies of interest.

The transformers have a wide range of inductance / frequency values, but fall broadly into two classes. All but one of the transformers from the black label microphones show fc values of between 20 and 50Hz, whereas the red label ones have a much wider spread. About half of the reds are very similar to the blacks, but the others have a much higher fc value – between 70 and 110 Hz.
Many of the black label transformers are marked “10202”, and are occasionally painted in blue, pink or purple. These are sometimes found in red label mics too. The transformers with lower inductance have a ‘sandwich’ of laminations with darker ones in the centre, and these are often marked “SE 4402”.
 |
| SE 4402 type Reslo transformers |
So it seems that we are somewhat closer to the truth about the red and black Reslos. The black ones are more consistent, and have a better chance of having a deeper bass response. Some of the red ones are just like the blacks, but about half the reds have a different, lower inductance transformer. These were probably designed for speech, and are not inherently better or worse than the others. However, if you are trying to record the lower frequencies of a bass instrument, or a fat electric guitar, then you may feel that the mics with the lower value for fc are more suited to the task.
We have spare 10202 black label transformers in stock, and also make replacement full range 300 ohm transformers for Reslo RB mics. So if your Reslo doesn’t sound up to scratch, then get in touch!
24-04-2012
Reslo black and red label microphones
Disclaimer
Firstly let me say that this is a study in progress, and should by no means be taken as definitive. Hopefully we will eventually have a big enough data set to be able to speak with confidence, but it will take a while!
 |
| Red and black badges on Reslo ribbon mics. |
Are black label Reslos better, or even different from red ones?
There is a rumour that occasionally appears on the internet concerning the relative merits of Reslosound RB microphones. Some of the mics have red labels, and others have black ones, which has led to speculation that the mics must be different, and one type must sound better than the other.
Normally it is stated that the black badged ones are better. Most rumours have some basis in fact, so let’s investigate!
 |
| Reslosound RB microphone dissected |
Over the past couple of years I have serviced around 50 Reslo mics, with both colours of badges. Here are some of my empirical observations…
1. The black ones are less common than the red ones, but they are by no means rare. I don’t have exact figures but perhaps 75% are red, and 25% black. I will be keeping note from now on!
Edit 29/11/2013: I wanted to correct this figure as I have seen it regurgitated on ebay a couple of times. Having seen a hundred or so more since I wrote this, I really can’t say that one is more rare than the other. I would probably guess that they are equally common.
2. There are at least three styles of red badges from different periods.
3. Some later mics (red and black) have a white plastic ribbon holder. The older mics have black bakelite holders. This should not affect the sound.
4. The transformers vary greatly in both looks and specs. This will affect the sound!
So, the only real differences between the red and black label microphones are the transformers (and possibly the state of the ribbons).
Recently, I had seven 30/50 ohm Reslo RB microphones on the bench, and I took the opportunity to examine the transformers. Although the basic construction is the same, the transformers are quite different in looks, and have different inductance values! Some have a striped core with two metals, the middle often being darker or rusty, suggesting a higher iron content.
 |
| Reslo transformers (left to right) A, B, D, E, F |
Impedance and resistance values
This is hardly a statistically significant data set, but here goes…
Black labels
A. Lp = 0.463 mH, Rp = 84 mΩ, Ratio = 1:12, fc = 103 Hz (purple)
B. Lp = 0.434 mH, Rp = 56 mΩ, Ratio = 1:12, fc = 110 Hz (pink)
C. Lp = 0.470 mH, Rp = 56 mΩ, Ratio = 1:12, fc = 102Hz
H. Lp = 0.514 mH, Rp = 52 mΩ, Ratio = 1:12, (purple)
I. Lp = 0.441 mH, Rp = 45 mΩ, Ratio = 1:12, (pink)
I. Lp = 0.441 mH, Rp = 45 mΩ, Ratio = 1:12, (pink)
Red Labels
D. Lp = 0.533 mH, Rp = 52 mΩ, Ratio = 1:12, fc = 89 Hz
E. Lp = 0.204 mH, Rp = 63 mΩ, Ratio = 1:13, fc = 234 Hz
F. Lp = 0.214 mH, Rp = 63 mΩ, Ratio = 1:13, fc = 223 Hz
G. Lp = 0.454 mH, Rp = 49 mΩ, Ratio = 1:12, fc = 105 Hz
Where Lp is the inductance at 1KHz, and Rp the DC resistance of the primary winding.
The mics are supposed to be 30 to 50 ohms output, and so from the ratio we can estimate the impedance of the ribbon and transformer itself to be around 0.3 ohms. The ribbon impedance and transformer inductance form a high pass filter, and so we can calculate the frequency, fc, at which the bottom end response drops away.* This handy tool means that we don’t have to get out our calculators.
* It must be noted that the inductance of a metal core rises and frequency drops, so the cut-off frequencies will in reality be somewhat lower than these values. However, they should be comparable to one another.
What we can say for now, from our very limited data set, is that the three black label transformers, and two of the red ones, have substantially higher inductances and lower cut-off frequencies than the other two red ones. This difference in bass response is likely to be what some users hear as ‘better’. However, it cannot be said that a red label mic always has less bass response than a black one.
The two transformers with purple paint have higher values than the ones with pink paint!
My feeling is that the later Reslos have ‘better’ transformers than the early mics, and that the colour is more cosmetic than diagnostic. But I shall keep adding to this list as more Reslos come into the workshop, and it will be interesting to see what trends develop.
And finally, if you are reading this and once worked for Reslo (or Grampian), we would love to hear from you.
Update 12 May 2012…
In 1961 the BBC R&D group studied the Reslosound RB microphone and recommended that the transformer be replaced with one of higher inductance. It seems plausible that the later Reslos were revised to use a different transformer following that study. You can read the BBC report here.
Stewart Tavener, Xaudia, First posted 24 April 2012, Latest update 12 May 2012
19-04-2012
Reslos in action 2 – Pete Gardiner

Pete Gardiner is a singer/songwriter and acoustic guitar player based in Newtownards, Northern Ireland and his new album ‘Songs at Sunset’ was produced by Paul Steen, who used a Reslo mic on the vocals alongside a Shure SM7b.
Paul bought one of our Xaudia upgrade transformers for his Reslo RB ribbon microphone, to give the mic an output of around 250 ohms. Paul fitted the transformer himself and used Ward Beck preamps for the recording. Paul said….
“I recorded with the reslo and an sm7b but the final edit ending up being 99% reslo. The sm7b is heavily compressed and dialled in on occasion for choruses etc.”
07-12-2011
T-bone RB500 reribbon & upgrade
Ronnie at Diesel Studios in Italy sent in a pair of T-bone RB500 ribbon mics for service and upgrade. Ronnie asked for some photos of the process, and I thought they would make a nice photo-blog.
Here is one of the mics on arrival…

Inside the body, there is further screening to protect the ribbon, and the transformer sits in a metal can.

One of the old ribbons.

This one is not so great!

New 1.8 micrometer ribbons….

The old transformer has primary DC resistance of 90 milliohms, and 30 ohms for the secondary. Those laminations are not very well packed.

Winding new transformers for the mics.
Potting the transformers in the wax bath keeps the coils and laminations from vibrating….

The finished transformers. We may as well re-use the metal can for some extra screening.

Back together again

02-12-2011
Stellar RM3 upgrades
This Stellar RM3 ribbon microphone recently came into the Xaudia workshop for a transformer upgrade and new ribbon, which of course gives us a chance to poke around inside and take some photos.
 |
| Stellar RM3 with new Xaudia transformer and ribbon. The old transformer in in the foreground |
The design closely follows the Speiden / B&O / Royer style of microphones – possibly a little too closely for comfort! Like the B&O mics, the ribbon frame slides out of the top, along with the transformer and lots of synthetic woolly packing. The body forms part of the magnetic return circuit, so it was good to see that this one was made of a magnetic steel, rather than brass or aluminium. In my opinion this is one of the better made of the budget ribbon mics.
As is commonly the case with budget microphones, the design is let down a little by the transformer, which measured 47 mΩ (milliohms) on the primary winding, and 90 Ω for the secondary, with a turns ratio of 1:54. Overall the mic gave a measured output impedance of about 650 Ω, of which over 200 ohms is pure DC resistance from the transformer. And in ribbon mics, resistance equals noise.

The new Xaudia 595/40 transformer (in this case a 1:40 ratio) has DC resistances of 0.02 Ω for the primary and 16 ohms for the secondary – much lower than the stock trannie. Although the lower transformer ratio would be expected drop the output level of -2.6 dB, the thinner, lighter ribbon gives an almost equal but opposite effect, and the output levels before and after are very similar. However, the lower DC resistance of the replacement transformer gives much lower noise, and the larger core allows higher sound pressure levels before the onset of saturation.
28-11-2011
The shape of things to come….
Here’s a sneak preview….
Can you tell what it is yet? 🙂
30-09-2011
MOTM – Cadenza Rocket ribbon mic
Sometimes I see patterns or trends in what arrives on the bench. A year ago it was RCA 74s, and in spring 2011 it was Electrovoice ribbon mics. And then the summer brought Melodium 42bs. Of course these are just statistical anomalies or ‘blips’ in the random noise of what my customers send me to repair, but it does at least suggest ideas for the regular ‘Microphone of the Month’ column.
 |
| Cadenza microphone set with box, documents and stand |
This month these little Cadenza ribbon microphones are in vogue – these were made by Simon SoundService Ltd in London, and were designed by Eric Tomson, Stanley Kelly Peter Bell. The mics have a very 1950s styling, and are often called ‘rocket’ mics. However, having spoken to a couple of customers, the consensus was that many of these microphones no longer sound as good as they should – or at least as good as they look. The complaints are that they are noisy, with low output.

The Cadenzas have dual impedance outputs, and can be wired for either 30 ohm or high impedance (80 KΩ) output by changing the wiring at the connector. Neither option is really ideal for modern studio use, where something between 200 and 600 ohms is much more common for a mic output.

The ribbon itself is slightly unusual in that it has a fixed or nodal point half way along, where the ribbon is glued to an insulated support. This may well have been designed to reduce the likelihood of the ribbon being stretched, and one can imagine this either as two ribbons in series, or like a guitar string where the octave harmonic has been struck.
 |
| Cadenza mic transformer under the knife |
From a technician’s viewpoint (i.e., my opinion :p), there are a some weak points in the design which all relate to the transformer. Firstly, the ribbon clamps are connected to the transformer simply by winding the wire under a nut and tightening it – really not a reliable long term approach. Secondly, the transformer wires are extremely thin, and half a century later the insulation becomes brittle and tends to break, with disastrous results. It is more common practice to use thick gauge wire for the fly-leads to the primary, to keep resistance and noise to a minimum. And finally, as these thin wires become old and oxidised, the mics become noisy.

This all points to a transformer upgrade or rewind. However, it seems that Simon Sound Services Ltd. did a better job of encapsulating the transformer than they did of connecting it to the ribbon. The tranny is glued inside a mu-metal can with a hard, clear resin that resists removal. It was necessary cut the metal shell in half and then to soak the resin in dichloromethane for 48 hours to remove the resin. This allows removal of the laminations and a better inspection of the transformer windings.
 |
| Cadenza windings – primary (left), and 30 ohm output (right) |
The outer high impedance winding is a very fine gauge (approx. 0.07 mm), below which is a single layer of 0.4 mm wire which makes up the primary. The innermost winding is the 30 ohm output, which is approximately 0.2 mm in diameter. Unfortunately the solvent also damaged the bobbin, and and a replacement was found to make a new transformer using the vintage laminations.

The new transformer has a single 600 ohm output, with thicker gauge wires to give lower resistance. It took some effort but the result is a higher output with a lower noise floor, and the mic is much more usable. I’ll post back with a ‘before’ and ‘after’ frequency plot for comparison.
28-09-2011
Reslo transformers vs the WEE monster

This little dinosaur sculpture was made out of waste winding coils, stripped mostly from old Reslo and other microphone transformers. 🙂
So why are we stripping transformer coils?
Some older ribbon mics were originally wound for 30 or 50 ohm output impedance, and tend to give a low output level when connected to modern recording equipment.
Many of these low impedance mics, including Reslo and Tannoy ribbons, can be rewound for a modern 200 or 600 ohm input, raising the output to a more useable level, and avoiding noise from having to crank up the preamps.
 |
| Bobbin from Reslo transformer with secondary winding removed. |
The old Relso 30/50 ohm transformers have an inner (primary) winding consisting of just 12 or 13 turns of thick (0.8 mm) enamelled wire, and a secondary winding of 152 turns of 0.4 mm wire. The thick wire of the inner winding ensures that the primary resistance is low, which keeps noise to a minimum.
 |
| Reslo transformer rewound for 600 ohm output |
Re-winding the transformer involves removing the outer winding from the original transformer and replacing it with sufficient turns of a thinner gauge to reach the desired turns ratio and output impedance. Usually the original primary winding can be kept in place. The transformer is then reassembled and dipped in wax to fix the windings and lams in place.
This makes the microphone much more usable in a modern studio – transformers can be would for 250Ω, 600Ω or any other desired output impedance.
29-06-2011
Redneck wax potting bath
We needed a better way of wax potting our pickups and transformers. Here’s what we did on a budget…
 |
| Redneck wax potting bath for guitar pickups |
It’s a hacked 300 Watt slow cooker, acquired from Tesco for the grand sum of £10, which contains an inner ceramic liner and holds about 3 litres. The probe is simply a cook’s thermometer (£14 from Barnitts of York).
It takes a little while to warm up, but sits at about 90 degrees all day, which is just about perfect for potting. The temperature can be further tweaked by running the bath on a variac.
Here’s a newly dipped transformer coming out of the soup – a mix of bees wax and parafin wax…

Update: 1 December 2011
The batteries in the cook’s thermometer died, and we really wanted to regulate the temperature and avoid the possibility of overheating the wax, so I built a little temperature controller into an old power supply box. The digital controller was ‘new old stock’ at £30 from ebay, and a 5 amp solid state relay and resistance thermometer came from Farnell to complete the setup. It works very well!

11-02-2010
Beyer dynamic transformer data sheet

09-02-2010
Gardners Transformers data sheet
