The Xaudia Blog

Synchron / Vega S10 Microphones

The Syncron Corporation are generally credited with launching the first transistorised capacitor microphone back in 1964 – the AU-7a, which was priced at $169.50 USD. In their own marketing, the manufacturer claimed to have built “the first microphone to successfully employ the Field Effect Transistor.” At the time, competitors such as Neumann were selling microphones with tube circuits such as the KM64 and U67 which required a separate power supply. The Syncron mics ran on batteries which saved lugging around an extra box and cable. I know we all love and revere the old Neumann tube microphones, but few would argue that they take longer to set up and warm up than a solid state mic.

Syncron-Vega S10 microphons

Following the AU7a, Syncron launched their second and final microphone, which was a rather nice small diaphragm condenser known as the S-10. By this time, the brand was owned by ‘Vega Electronics Corporation’ and had the address on their documents had moved from Connecticut to Santa Clara in California. The price for new microphones was $260.  

I was sent three S-10 microphones to clean, service and convert to phantom power for a customer. These mics were badged ‘Vega’./ Like the AU7As, they were designed to run on two obsolete batteries, and so being able to run on standard +48V would be make them much more useable.

Vega S-10 original circuit and transformer, 

The mics were a bit of a mess. They had been stored damp at some point and showed corrosion inside and out. I wanted to be sympathetic to the original simple circuit  They are a one-transistor circuit with an output transformer, much like a Neumann KM84, and so for the phantom conversion I decided to re-build with a KM84 style circuit, keeping the original transformers. 

KM84 type circuit – Russell Technology board

With a bit of improvisation I was able to rebuild the circuits using circuit boards from Russell Technologies, utilising the space freed by removing the batteries to house the phantom circuit and the transformer. The circuit boards were originally designed as an upgrade for the AKG C480B, and uses a smaller transformer than the Vega. To accommodate the larger transformer I hacked off the end of the board and wired the transformer directly.

PCB from Russell Technologies – rear

S-10 with new PCB and transformer in place.

These microphones used a 4-pin XLR output. The fourth pin was used to make a connection to the battery within the plug of the connecting cable, which means that the batteries would not go flat so long as the microphone was unplugged between sessions. I swapped these for standard 3 pin XLRs of course.

Is four better than three? No.

Although we started with three microphones, one capsule was bad and one transformer was open circuit, so we have two nice condenser microphones, which are well balanced and sound good. The sound is a little less bright and a touch warmer than a KM84. I liked these microphones and was sorry to see them go home.

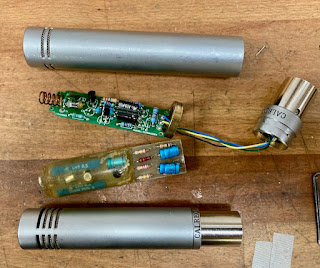
Syncron-Vega S-10 microphones

Update.

 Jason at Crunch studios kindly shared the photo below and sound clip of his Vega S-10 in action.

Recording drums with the S-10 at Crunch Studios

Sound clip of the S10 in action:

You can read more about Syncron microphones at the Coutant website. 

Thanks to Jason Baldock at Crunch Studios

Testing the Sennheiser MD409 family

I recently had the opportunity to test a bunch of Sennheiser MD409 and related microphones. These small dynamic microphones command eye-watering prices because they were used by a couple of famous rock bands in the 1970s. 

Devices under test – five MD409s, BF509, MD609 and another.

The prices seem high for such a simple device – the microphone consists only of two grills, stem with an XLR socket, frame, and capsule, along with some foam and a couple of screws to hold everything in place. There are no transformers in these microphones, and the output runs straight from the capsule to the XLR socket.

Inside the MD409. Photos by Lester Smith at Abbey Road.

All of those parts except from the capsule are also found in the current e609 model, which is not revered in the same way and can be found new or used for less than the price of a Shure SM57 .

So the magic must be in that capsule…. right?  Similar looking capsules were used in various other Sennheiser and re-branded models, although there can be subtle differences especially in the baffle at the front and the vents in the rear. The 402/3 capsule is often mentioned in internet chat rooms as a close alternative, and so I tested one for comparison, wired into the body of a similar looking Chinese mic.

Sennheiser 402/3 capsule

For the test I had access to five MD409-U3s, one BF509 and one e609, as well as a 403/3 capsule in a replica body. 

The questions I wanted to ask are as follows….

Firstly, do MD409s age well and remain consistent? In other words, if we have a conversation about “the 409 sound”, are we even talking about the same sound? 

Secondly, is the BF509 really the same microphone?

And thirdly, (for those of us without deep pockets), how close can you get with either an e609 or a reportedly similar alternative like the 402/3 capsule?

Tests were performed in the booth at Extinct Audio, with a swept sine wave method. Here’s what we found.

1. Frequency sweeps of five MD409-U3 microphones.

1. The MD409s are very consistent. We tested five used MD409s and four of them were very close to each other, with a fifth mic showing just a little less bass. The signature sound of these capsules is a 5dB presence bump in the 100 to 200 Hz region, with a dip below 100Hz.

2 & 3. MD409, BF509 and e609 microphones compared.

2. The BF509 sounds similar and the sweep and falls within the range of the five MD409 that we tested. 

3. The e609 is another nice microphone but is a little different to its predecessors. It also has a low end bump, a bit broader than the MD409, and has a broad lift around 5KHz. The top end rolls off a bit earlier than the older mics, which you may notice if you haven’t stood in front of a guitar amp for a couple of decades. Your dog will know. 

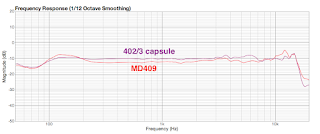
4. MD409 compared with a 402/3 capsule

4. The 402/3 capsule tested lacks the low end bump but shows a very flat response. It is nice but not the same.

In summary, the MD409s were consistent and the BF509 seems to be the same microphone. The e609 is a little different, but with a touch of EQ it makes a good substitute for those who can’t afford the current vintage prices, or who don’t want to take their precious artefact on tour.

Thanks to Sam Inglis for help with this article.

We have a Reverb store!


We have opened a store on Reverb.com for Extinct Audio parts and accessories.

The motivation behind this is the recent changes to import laws from the UK into Europe.

For orders of new goods under €150, we can ship direct without any additional taxes to be paid on import to the EU. The customer still pays the tax but it is collected by Reverb at the point of sale. This means that there are no unexpected bills to pay when you receive the order.  Consequently we would encourage our friends in the EU to buy accessories though our Reverb store.

The store sells our thread adapters, transform boxes and splitters.

This only works for lower value orders and so the shop will just be for parts and accessories. If you wish to order Extinct Audio microphones then you will still need to either buy direct from the Extinct Audio web shop, or from one of our international dealers.

Beyer M30 – a super-rare early ribbon microphone

To the best of my knowledge, this M30 is the earliest production model Beyer ribbon microphone. (Do please send me a message if you know of an earlier one). Here it is pictured with a modern M160 for scale.

This microphone came in for repair with most of the original piston ribbon in place. The first thing that leaps out is that, from the outset, Beyer went in their own direction for corrugating the ribbon. 

I have heard a couple of suggestions about why this may be. Pistonic ribbons are in theory more efficient as the ribbon moves through the magnetic flux in a flat manner although my own measurements suggest that it only gives a couple of dB at best. Perhaps the most convincing one was Wes Dooley’s suggestion that they were circumventing RCA patents for the more common wiggly ribbons. 

The magnetic circuit itself is a work of art, bringing the field from the large block magnet to the sides of the ribbon through four arms. The body of the microphone is chromed brass with one of the most substantial grills that I have ever seen. And the output transformer is a large toroidal type similar to those found in the earliest Oktava microphones and also old Siemens M201 ribbon mics.

I have talked to a lot of customers about this subject and there is a roughly equal split on which type of ribbon sounds ‘better’, with some preferring RCA style and others insisting that pistonic is best. The reader can make their own mind up about that! However, from a technical perspective, I have the equipment to make the wiggly ribbons but not the pistons. 

From a historical perpective, it was nice to see the old ribbon. But it was somewhat damaged, a little corroded and stuck to the side of the motor. I took lots of photos and asked Marco, the owner, if he wanted a museum piece or a working microphone. It can be hard to make these decisions but we went ahead and repaired the microphone, which sounds rather lovely with a new ribbon in place.

Marco kindly shared a recording he made with the M30. The microphone was positioned around 40-50 cm from the singer, and the band performed in a ‘small shack’ of about 4,5 x 3,5 m.  There is naturally some spill from other instruments in the M30 but it gives a good indication of how well an old ribbon microphone like this can perform. 
Listen to “Old Devil Moon” by Binky All Stars

Thanks to Marco at Vintage Microphone World for sharing his insight, microphones and recordings. His book ‘Witnesses of Words‘ is well worth checking out.

Update 31 July 2022

Thanks to Raphael and Carsten at Echoschall in Germany for sharing this page from an old Beyer catalog. The page shows that the M30 was priced at 700 Deutschmarks which was a lot of money at the time. There was also an M31, which I have never seen. The term “Geschwindigkeitsmikrofon” translates as “velocity microphone“.

B&O BM5 stereo collet repair

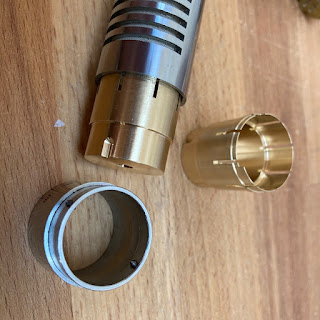
This is a really common problem with B&O stereo microphones. They snap in half! At the time of writing I have over ten broken BM5s in my inventory and some repairs for customers, and so clearly something needs to be done.

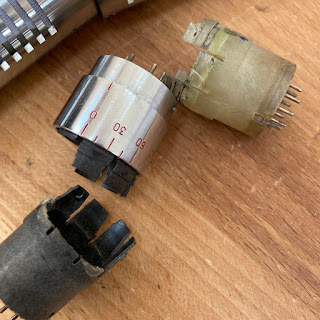
The rotating mechanisms were (usually*) made from plastic. With time and use, the plastic parts become brittle and the teeth break away. First the mic becomes wobbly and then can break away completely. These parts are also make the top part of the microphone difficult to service because it can be impossible to remove the collet without causing further damage.

And so I commissioned some replacement collets and can now offer repairs for this problem.

Brass collet for BM5

The replacement part is machined from brass and won’t break easily. There is some re-wiring to be done. The BM5 used a 9 pin socket which was not easy to replicate. And so we simply run the wires through a hole in the collet and solder together. The socket can get oxidised and noisy anyway, and there is no real need to remove the top part in general use. 

Using a brass collet has the additional benefit of making a good electrical contact between the top and bottom mic, which means better grounding.**

Here is the repaired rotating mechanism which should be good for another few decades of use.

These parts are made specifically for Xaudia in the North of England.

Notes.

* Some later BM5s used a different design with steel parts. B&O clearly realised that they had a problem. 

** I have addressed the grounding issue in an earlier post.


Yuchain Wang, musicial and producer from New Taipei City in Taiwan, shared this cover version of Joni Mitchell’s ‘A case of you‘.

The vocals were recorded using an upgraded Lustraphone VR53 ribbon microphone. I fitted the microphone with new ribbon and magnets.  The Lustraphones are a bit notorious for having a weak output signal and a very dark tone, but the changes make a big improvement to their usability. 

You can read more about the magnet upgrades in a previous post.

Andrew Cadie – Down Where the Drunkards Roll

Andrew Cadie recorded this great version of Richard Thompson’s song, ‘Down where the drunkards roll’, using just a pair of B&O BM6x microphones to pick up his voice and acoustic guitar.

You can hear more of Andrew as he will play some recent compositions and a handful of cover versions, on Thursday 3rd December 2020 at 20:00 (Ger) / 7pm (UK) – all from his cozy studio couch. You can tune in at his facebook page or  youtube channel. 

Andrew’s microphones were upgraded here at Xaudia, and fitted with new ribbons and magnets, and an upgraded transformer. These changes raise the output level and reduce the noise substantially, turning them into very fine ribbon microphones.

Melodium 42B replacement magnets

Eleven Melodium 42Bs in for service at Xaudia

We now stock magnet assemblies to replace weak or cracked magnets in Melodium 42B ribbon microphones. *

Replacement magnet assembly for Melodium 42B ribbon microphones

The horseshoe type magnets found in some of these mics tend to hold their field well and rarely fail. However, I have occasionally encountered examples where the magnets have cracked and lost some of their strength. This may happen if the mounting screws are overtightened or the microphone has been abused.

Around half of the 42Bs use block magnets with a carrier bar to complete the magnetic loop. These are more prone to losing their field especially if they are removed from the microphone for some reason. It is hard to predict how these will behave. Luckily we can measure them and see if they are up to scratch. A healthy microphone should show above 3000 Gauss in the ribbon gap to give good signal to noise performance.

In this example, the field is down to around 2400 Gauss, which is at about 80% of where it should be. That amounts to 2dB loss of output – not yet a disaster but may be heading that way. With the new assembly in place we measure around 6000 Gauss, which is up + 6dB on a ‘good’ stock Melodium 42B.

*Magnet failure is rare. A bad ribbon is the most common cause of a weak signal in these microphones, and would be worthwhile testing the ribbon before embarking on any kind of magnet service.

Sennheiser MD409 foam failure

This seems to be a common issue with old Sennheiser MD409 and similar microphones.

Sennheiser MD409 foam failure

The capsule is held in place by a block of polyurethane foam, which slowly decomposes over the decades, especially if the microphone has been in use in a sweaty rock venue.

Sennheiser MD409 new foam

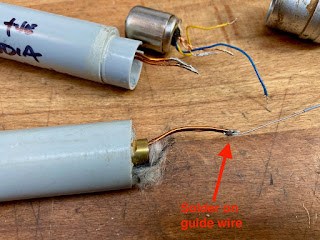
If left for too long, that capsule will rattle around and there is a risk of more serious damage. the foam can also become sticky and contaminate the capsule diaphragm. If things have not gone too far, it is an easy job to cut some new foam, clean the grills and then the mic is ready for another shift in the studio.

MD409 pair with new foam cleaned and ready to rock

Lustraphone VR53 upgrade

It has been a long time since my last blog post!

This is mainly because the launch of Extinct Audio took up much more of my time and energy than I had ever imagined. But I have missed this blog and will be posting a bit more often in the coming weeks and months. Thanks for your support.

Lustraphone VR53 ribbon microphone

This week I have been working on a few Lustraphone VR53 ribbon microphones. I have never been very enthusiastic about these mics because generally they have a weak output and can sound dark and flabby. Replacing the ribbons and transformers will get the mic so far, but they never quite get up to the performance of other British ribbon mics like the Reslos and Grampians. Which is a shame because they have a unique vintage design and look as though they should be good!

Part of the problem is the magnetic circuit. The two horseshoe magnets provide the field which is conducted (rather inefficiently) around a steel structure to the ribbon. This gives a field around 1500 to 2000 gauss. (For comparison, the field in a healthy Reslo would typically be around 4000 gauss.)

Milling the pole pieces to make room for new magnets.

The steel pole structure is the limiting factor here and so swapping the horseshoe magnets gives only marginal improvements. For this upgrade I made a decision to mill out the pole pieces and fit some strong magnets right next to the ribbon.

The difference is impressive, bringing the field across the ribbon to 6000 gauss, which should provide about +9 to +12dB increase  in output voltage. With a new ribbon fitted. the output and signal to noise were improved overall by 20dB. Now it can give the other microphones a good run for their money.

Before and after… new magnets and ribbons.

As an aside, the stock 200 ohm transformer in this example is actually pretty good and don’t need to be replaced. The 30 ohm and high impedance models are not very well suited to a modern studio and in those cases it is worth swapping them out for a more sensible tranny.

You can read my earlier post about the Lustraphone VR53 microphones here.