The ‘Tesla’ looks very much like an imitation of the Neumann / Gefell CMV563 bottle mic. In fact the microphone is smaller in diameter than the CMV, has no output transformer and has an unbalanced output. Like the CMV, the capsule may be swapped, and presumably other polar patterns were available. This one is marked with a red circle, which probably means omnidirectional. (I have yet to test the capsule).
The amplifier is a very simple grounded cathode amplifier, based around a Soviet 6Ж1Л (6Z1P) tube, which is a small signal pentode similar to EF95. These are also found in some Lomo and Oktava microphones, including the Lomo 19a9 and Oktava MKL2500.
Without the original power supply we can only speculate on the operating voltages. However, a B+ supply of 90V would be a good place for experiments to start – this would give a voltage on the capsule of around 60, and a sensible current through the tube circuit.
Even in the simplest of tube microphone circuits, there are different approaches to connecting the microphone capsule to the tube. Let’s use a single-sided microphone capsule as our starting point.
The capsule behaves as a variable capacitor, changing its capacitance in response to changes in air pressure (i.e. sound). In order to generate a signal, the capsule needs to be polarised by some voltage, creating a difference in potential between the diaphragm and the back plate. This is the first decision that needs to be made – should the polarising voltage be applied to the diaphragm or the capsule backplate?
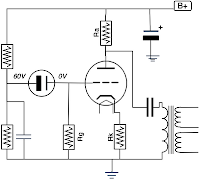
In the circuit shown on the left, the backplate of the microphone is polarised at 60V, which is obtained from the B+ supply, via a resistive divider and a small capacitor to stabilise and filter the polarising voltage. The membrane is connected directly to the tube grid, and a high value resistor (Rg, typically 100 kΩ to 1000 kΩ) connects both the grid and the membrane to ground. We have our potential difference across the membrane, and the sensitivity of the mic may be adjusted by increasing and decreasing the polarisation voltage. As the capacitance of the capsule changes in response to sound, a tiny current will flow through Rg, and this signal is amplified by the tube.
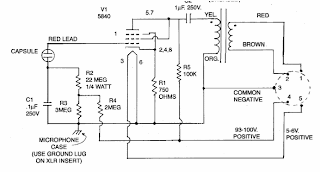
In some cases the grid resistor may be omitted. In the circuit below, which appeared in an article in Tape Op magazine by Dave Royer, the capsule diaphragm is grounded by grid leakage rather than a ‘real’ resistor. It works perfectly.
This simple arrangement is not possible when the capsule backplate is mechanically (and electrically) connected to the body of the microphone. In this case the diaphragm must be polarised directly.
However, having a voltage of around 60V on the tube grid this would adversely change the operating points of the tube circuit, and so a capacitor must be used to block the DC voltage (left). Some listeners claim to hear the difference between different types of capacitors, and so normally a very high quality type should be used in this position. An additional high value polarising resistor is also required, otherwise the high impedance audio signal would be attenuated through the stabilisation cap.
An example of this method of connection is the Neumann-Gefell CMV563, which is designed to be used with bayonette style capsules such as the M7, M8 and M9.
Sometimes it is the membrane which is connected directly to the body, such as in this Teladi K120. The approach is the same as the circuit above.
In my next post I’ll consider how to connect mic capsules with two membranes, and how to combine them to generate different polar patterns.
Lately I’ve had the opportunity to play around with several vintage Neumann Gefell tube microphones – a CMV563 (below with UM70 capsule) , a M582 and a pair of UM57s.
These all have broadly similar circuits, with a EC92 tube and transformer coupled feedback. The UM57 is configured for different polar patterns, whereas with the CMV563 and M582 you have to swap the capsule. There are other differences – the schematics are shown here.
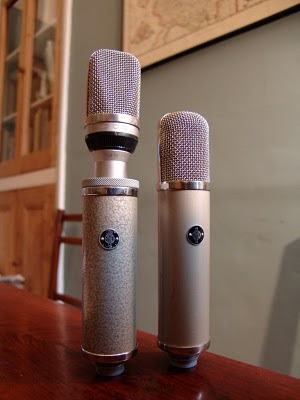
One particularly common fault with examples of these microphones is that the original electrolytic output capacitor can dry out with age. This is by no means always the case, and the capacitor in the UM57 on the left above was in perfect condition after nearly 50 years! The one on the right has been replaced with an orange modern metalised film capacitor.
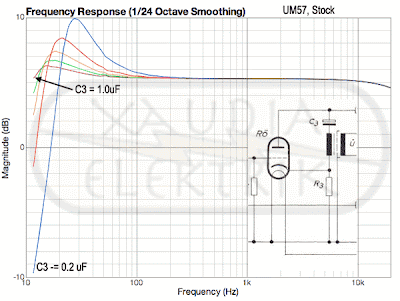
So what is the effect of ageing of this capacitor? As the electrolyte dries out, the absolute value of the capacitance drops, which will affect the frequency response of the valve amplifier inside the microphone. To simulate this, a capacitance decade box was wired in place of the output capacitor (C3), and the chart below shows how the frequency response changes as the capacitance decreases in 0.2 uF steps.*
Part of the circuit is shown inset within the chart. Although intuitively we expect the smaller capacitor to give us less bottom end, the network of the capacitor, transformer primary winding and resistor acts as a resonant filter, producing a peak in the bass region just above a sharp drop off. The human ear can perceive this as more bass – although not necessarily in a good way: the microphone may seem muddy or lack clarity.
So, having a good quality capacitor here is vital, and the value of this can be used to tweak the bass response if desired. Of course this analysis is just for the tube circuit inside the mic and does not consider the effects of ageing on the capsule itself – that’s a story for another day.
SJT Feb 2010
* Measured using a swept-sine wave from 1Hz to 48KHz.