The Xaudia Blog

SC2 Mini-lathe

The mini-lathe is here!

Delivery was a little late due to the snow and ice, but it finally arrived on Tuesday. After unpacking and cleaning off the excessive quantities of grease, I made a couple of quick jobs as part of the learning curve – the best way to learn is by doing, even if it involves a few mistakes.

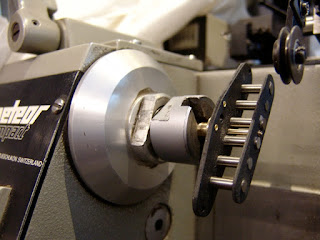
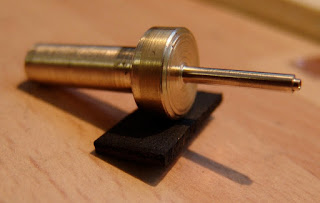
First up was to machine this  little spindle to hold bobbins for the coil winder. The spindle is in two parts, and is made from 10mm diameter aluminium rod. The lathe is very handy for making little tools like this.

Then I used the lathe to replace the broken connector on this B&O microphone. The old connector was cut off, the hole widened and threaded to take an XLR output. Finally I can get this mic up and running! ðŸ™‚

B&O BM3 with XLR output

The lathe is a useful addition to the workshop, and is already proving its worth. It needs a few tweaks to set it up and take some of the slack out of the slides. Luckily, mini-lathe.com have excellent information and guides to setting up these machines.

Grampian GR1 XLR conversion

At Xaudia, one of the most common enquiries that we get is for replacement cables and connectors for vintage microphones. Very often we can help, but some of the connectors are becoming impossible to find in good condition and at reasonable prices.

Grampian GR1 ribbon mic with connector & cable

One example is the Grampian plug that was used for their GR1 ribbon and other microphones. These connectors are hard to find – they can be obtained by buying a less valuable Grampian dynamic mic, but we have found that the plugs come with various slightly different threads, which means that one plug cannot be guaranteed to fit another microphone. And the connector is not ideal in the first place – it has two prongs and for balanced use the screen of the cable is connected to the plug casing (and therefore the microphone) by pressure only. Grounding issues are therefore common.

There is, however, another approach, which is to dispense with the connector entirely, and replace it with a modern, industry standard XLR connector. This microphone arrived without a plug and with a rather battered and bent connector at the bottom of the mic.

The decision was made to replace it with a silver-plated XLR output, which also solves any grounding issues as the third pin may be connected to the body of the mic.

The old connector was cut off, and the housing threaded to accept the new connector.

The new XLR output is then simply screwed in place… and the mic rewired and put back together.

XLR modified Grampian

Everything works nicely – just plug a standard XLR mic cable and it is ready to record.

Some may see this as vandalism, and perhaps from a collectors point of view, it is. However, the conversion is sympathetic, and it is far better for the mic to be making recordings, than to be languishing in a box unused.

Bang and Olufsen BM2 microphone

Last month we were lucky enough to see this rare and beautiful B&O BM2 microphone pass through the workshop.

According to the BeoPhile.com website, these were made from 1951, and was replaced by the very different looking BM3 in 1962. Although different in appearance, the motor assembly and ribbon are similar in both cases.

The BM2 also has a switchable high pass filter to select between the music and voice modes, and also shares a hard-to-find connector with the BM3 & BM4.

Beyond that, we don’t know a whole lot about it!

Reslo wiring guide

This is the ‘official’ wiring information from the Reslo RB brochure…

As you can see, different models had different wiring conventions and required different colour coded cables. This can cause confusion, particularly if the mic has been separated from its original cable in the 40 or so years since manufacture. The most important thing is to check the mic and cable wiring and make sure that they match!

Unfortunately, grounding the mic by connecting the cable screen to the body of the plug does not work well, and these mics are prone to hum. For the low impedance models, it seems sensible to use pins A and B for the balanced output, and pin C for ground. The ground must also be connected to somewhere to the body of the mic and/or to the shell of the cable.

The dual impedance models are particularly problematic, in that pins B and C were used to select either low or high impedance output. This means that if one pin is used as a ground then one part of the transformer will be grounded and some of the signal lost. It is therefore important to disconnect the high impedance leg inside the mic and rewire to match the cable.

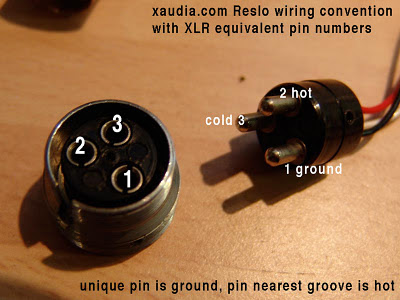
Here is how we wire our Reslo microphones and their cables at Xaudia – with equivalent XLR numbers.
Most 21st century users want a balanced, low impedance output with good ground connection, preferably with an XLR connector at the other end of the cable. Pin A (hot) becomes Pin 2 at the XLR, Pin B becomes Pin 3, and Pin C (ground) becomes Pin 1.
(link corrected 28 Jan 2013)

MOTM – RCA Selmer RL1

The first “microphone of the month” for 2012 is the RSA RL1… also known as the Selmer RL1.
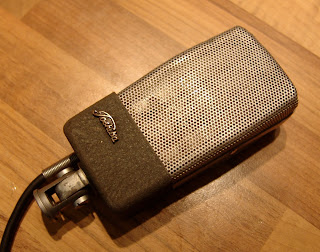
RSA Selmer RL1 microphones

So what’s in a name? Some of these microphones have two manufacturers’ names on them: RSA is proudly embossed on  the aluminium body of the mic, whereas the switch plate reads ‘Type RL1, H. Selmer & Co. Ltd., London, Made in England”. Others have RSA on the switch plate too, although these seem to be less common, and I have only come across one example of this.

According to the Vintage Hofner website, Selmer took over the R.S. Amplifiers Ltd in 1947, and presumably these schizophrenic examples come from around that time, when the new owners were using up the cast casings. They are are made from a big slab cast aluminium, with a chrome grill. They are mounted by a yoke with a switch in the base, and the black paint with bare aluminium stripes gives it a very distinctive Bauhaus* / Art Deco appearance.

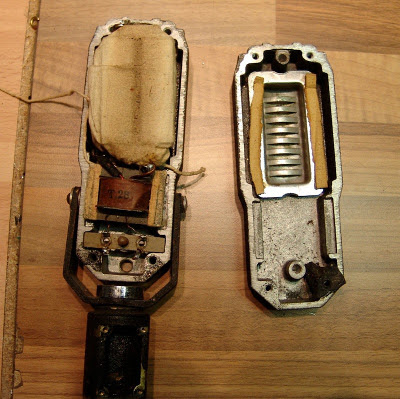
Inside the RCA Selmer RL1 microphone

The main body of the mic contains the ribbon motor assembly, hidden inside a cotton bag, and a large iron core transformer with a very thick double (parallel) primary winding. The secondary winding connects to a short length of cable, which goes off to the switch.

One thing to note about these mics is that many of them are designed for a very low impedance. The relatively thick piston style ribbon and low ratio transformer combine to give an output impedance of around 15 ohms (measured at 1kHz), and so they can seem very weak when plugged into a modern preamp.  In this case a matching transformer is essential to get a decent level from the mic.

Also, these mics do not generally have a secure earth connections, and may hum unless one is provided. Fortunately, it is a simple job to add a terminal to the inside of the body.

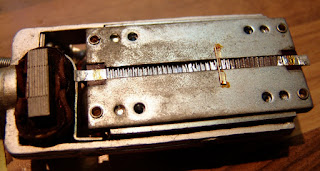
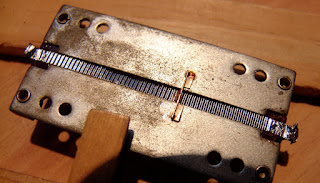
Piston style corrugated ribbon.

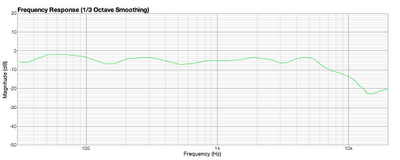
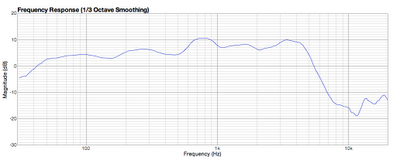
In terms of sound, these have a very vintage tone and limited bandwidth, rolling off rapidly above around 4kHz – perfect for an old AM radio broadcast effect.

RSA RL1 frequency plot 

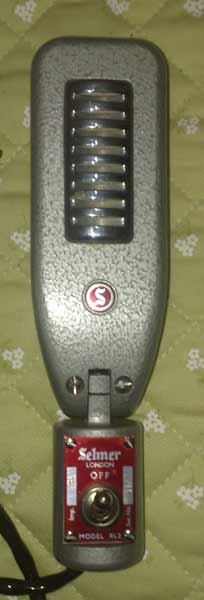
The RL1 was eventually replaced by the fully Selmer-ised RL2, which used the same grill insert. The RL2 seems to be a very rare thing indeed.

Selmer RL2, from Vintage Hofner website

* The design school, rather than the goth band. Although either might apply.

Fender Telemaster build

My holiday project was assembling this Telemaster guitar, from parts acquired that I have accumulated over the past six months or so.

Fender (ish) Telemaster guitar, Xaudia

The ‘Telemaster’ is an imagined product that Fender might have made in the 1960s or 70s, but never did – it is essentially a Jazzmaster body with Telecaster hardware. In this case I used a neck with a Strat-style headstock, and added a Fender-badged Bigsby vibrato, simply because I love the Bigsby sound.

The ash body & scratch plate were made and sprayed by John Manuel of Carlisle, who did an amazing job with a nitrocellulose transparent white – it really shows the lovely grain below. He can be contacted through ebay.

The neck and locking tuners were from Vanson guitars. The neck is pretty nice quality, although I did need to rub it down with some very fine abrasive paper to remove a couple of rough spots in the varnish. I found it slightly chunkier in profile than an original Jazzmaster neck.

Bigsby with super-tremola upgrade

One thing that I don’t love about Bigsbys is re-stringing them. The ball ends of the strings have a tendency to slip off the metal posts, which can be very frustrating, and one really needs four hands for the job – to hold the string at both ends, keep in under tension, and turn the tuner! Two things help with this – firstly locking tuners clamp the string at that end, and also I have fitted a Duesenberg super tremola kit, from Rockinger, which replaces the posts with a through-hole system. Much less frustrating!

home made telecaster pickup

The pickups are of course home made, and I tried to get as close to the original Telecaster specs as I could. Rather than using a bobbin/former to wind the coil, the core of the pickups were made using top and bottom ‘flatwork’, glued to Alnico rods. Enamelled wire was then wound directly onto the magnets, which avoids the gap between magnets and wire that is inherent with a plastic former.

The bridge pickup was wound with 8500 turns of 42 gauge wire, and the bridge was reverse-wound with around 6500 turns of 43 gauge, and of course reverse polarity for the magnets.  Once wound, the pickups are wrapped with string to protect the delicate coil, and then dipped in wax to stop microphonics. The whole thing is very solid, and rather heavy.

I did briefly consider adding a headstock decal to complete the fake Fender look, but decided that it was too good to give anyone else the credit – so it has a nice Xaudia badge. I am rather proud of it! 🙂

Happy 2012!

2011 was a big year, with lots of changes.

Although we have been fixing ribbon mics for our own studio and a few customers for several years, 2011 was the first year that we went public and began to advertise the re-ribboning service. The mic repairs were moved to their own special room, with a dedicated testing chamber. The other big development was the acquisition of our Meteor coil winder, and the decision to do transformer repairs and re-winds in-house. This has vastly expanded the services that we can offer.

In 2011 we repaired some 186 microphones, along with a few guitars, amplifiers, reverbs, DI boxes and so on.

Xaudia – Distribution of microphones serviced in 2012, by manufacturer. 

The various models of Reslosound mics have been the most popular brand – there are still a lot of these around kicking around in Europe, and we serviced 37 of these in 2011. As one would expect, there were also quite a few RCA ribbon mics – 23 passed through our hands this year.

We would like to thank all of our customers for helping to make this such an excellent and fun year, and we look forward to even more exciting things in 2012.

Happy New Year!
Stewart & Jane
Xaudia.com

Microphone of the month – Index of posts

Here is a list of all the Microphone of the Month articles up to the end of 2011.

2010
Sep: Old Czech tube mic
Nov: RCA 77b
Dec: Philips ribbon mic

2011
Jan: Sony FV300 dynamic
Feb: Zephyr 30RA
Mar: Shaftesbury Velodyne
Apr: Framez ribbon mic
May: Melodium 42b
Jul & Aug: GEC BCS 2370 & 2373
Sep: Cadenza ‘rocket’ mic
Nov: Lustraphone ribbon mic
Dec: LEM 305 and 306

Looking back, there are a couple of gaps. October was swallowed up by installation work at York Maze, and June saw the arrival and installation of our coil winding facility, so I found little time for blogging.

I hope to be a little more efficient in 2012!

MOTM – LEM 305 ribbon mics

December’s Microphones of the Month are these impressive art deco-style LEM ribbon mics. LEM are a French manufacturer who still make reporter-style dynamic microphones. They used to make really cool looking ribbons!

LEM 305 / 306 microphones
These are all high impedance mics, and although they are substantially similar, there are some subtle differences between the models.

Inside the LEMs
The microphones all use large, 6 mm wide ribbon which sit between two steel pole-pieces. One of the mics arrived with fully corrugated ribbons, whereas the others had thicker, half-corrgated ribbons.
LEM 306 ribbon motor with holes in the pole-pieces.

The magnets are different – in the one, a pair of block magnets are connected at the rear by a welded steel plate, whereas two have a pair of horsehoe magnets. The smaller, more powerful magnets in the later models allow holes to be made in the pole-pieces, which (in theory at least) should give better high frequency response.
LEM 305 magnets

The other obvious difference between the microphones is the transformer, with the older models having a larger, iron core, whereas the newer ones have smaller mu-metal laminations, and these transformers are housed in screening cans.

Sadly all three transformers were faulty – the old rubber insulation around them had become brittle with time and the wires were broken. We were able to re-wind the two, but the third had suffered from an earlier bodged repair attempt, and had to be replaced completely. In this case we took the opportunity to give it a 300 ohm output impedance.

LEM transformers in metal screening cans
LEM transformer with larger core

Once serviced, these mics work well, with fair output for old ribbon mics, and a good vintage tone.

Frequency plots for LEM ribbon microphones, after servicing.
Update: Here is  a product sheet for the LEM305, in French and English. Thanks to Microphone Online Museum for sending the link.

Update 5/1/15: Thanks to Philippe Le Gourdiol for sending in this picture of his LEM ribbon microphone, which is a low impedance model with a high-pass filter. The filter inductor is located below the motor assembly…

STC 4136 condenser mic – phantom power

Here is a little curiosity. STC are mostly known for making high quality ribbon and dynamic mics, inclduing the much loved 4033 and 4038 models. But they also made condenser mics, and this nice little STC condenser mic came in for service recently….

It is model number 4136, and according to its specification sheet would originally have had its own power supply, which ran on either mains voltage or five 9 Volt batteries. Unfortunately the mic was bought without the power supply. The power would have been supplied to one pin of the XLR connector, ground to another, and (unbalanced) audio to the third.  The capsule has a sintered glass, metallised backplate.

The battery supply suggests that 45V should be sufficient to power the mic. There was some corrosion on the circuit board from leaky capacitors, and without the original PSU, or knowledge of the operating voltage, it seemed sensible to create a balanced phantom powered circuit, loosely based on the Neumann KM84 – this is shown below along with the original circuit.

In practice, the conversion worked nicely, and despite its age and rough looks, the capsule gave a relatively even response, with a broadly cardioid pattern.

Measured frequency response plot for STC 4136