
Xaudia customer services!
Xaudia customer services!
 |
| Xaudia ‘Trashcaster’ guitar |


A couple of coats of clear lacquer helps the slide-on decal blend in. But perhaps I should have called it the ‘Nashmaster’. Too late now! The last job was to file the nut to take the narrower gauge Nashville strings, and to do this you really need a proper set of nut files. They are not cheap but I found these ones on ebay for around £40, and they did the job quickly and accurately.
Here’s a broken EF40 pentode tube. I dropped it, so took the opportunity to take a peek inside. The construction is intricate and quite beautiful.
 |
| Inside the EF40 tube, glass envelope removed |
 |
| EF40 pentode with screen removed |
 |
| EF40 with getter, mica insulation and plate removed |
 |
| EF40 showing grids heaters and cathode |
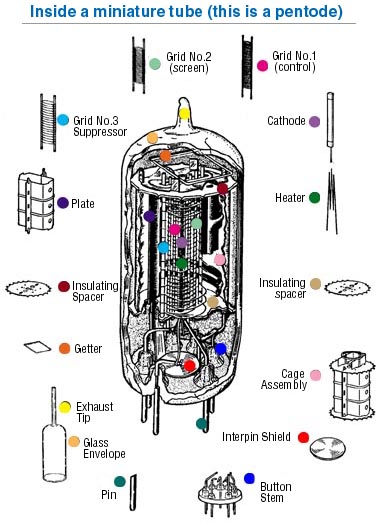
Vacuumtubes.net have a good description of how tubes work, and this diagram from shows all the parts:
I have no idea who made October’s microphone of the month. But it is quite a beast, dwarfing the SM57 that I have used as a geologist’s hammer*.
 |
| Italian ribbon microphone by an unknown maker |
This one came from Italian ebay, and has a whiff of DIY about it. Except that if it is, the work quality is very high. It could well have been a project for an engineering degree. Or perhaps a prototype from a professional workshop? Some parts of the mic are well thought out, but ultimately it is let down by the transformer and low magnetic field.
The microphone body is based around brass tubing with an imposing chromed grill and chromed bells at each end. The base is fitted with a (horrible) 4 pin CB-radio style plug. The yoke is nicely bent aluminium with a turned base and wingnuts.
 |
| Italian ribbon mic – motor and magnets |
Inside, four large cylinder magnets are clamped between two heavy blocks of mild steel, and the ribbon motor sits at the centre. There is a hint of the RCA 44BX in this approach, and the ribbon is of similar dimensions to that mic. The ribbon itself is clamped with sturdy brass blocks. These magnets here are not really strong enough for the job and the measured field in the ribbon gap is around 1000 gauss – a bit low really. Perhaps they were once stronger than this.
The transformer has its own internal can for extra screening, and the connections to the tranny primary are made with heavy copper for very low resistance. Good thinking!
 |
| Ribbon mic transformer |
The transformer itself looks home-made from recycled laminations. Although the thick copper wire for the primary is a sensible choice, the inductance is a rather low 24 microHenries and there is no chance of reproducing a full frequency range. These lams look familiar – I have seen similar ones in Thiele microphones for the power transformer, and also, I think, in Geloso amplifiers
 |
| Domed end cap of the mic, with striped output leads |
The maker, whoever he was, has used brass, mild and stainless steels, copper and aluminium for the construction. Parts are turned, milled, brazed, folded and domed. It looks more and more like an engineering workshop project designed to showcase the maximum number of skills, and in that respect it does a very good job.
Better laminations or a new transformer would show the true potential of this mic, as would some stronger magnets to boost the field. I will try that!
A few weeks ago we received this rather forlorn looking box of Melodium bits for service!
 |
| Melodium 42B stripped down to parts |
The good news was that all the important parts were there, and despite some corrosion, the magnets and the transformer were on good shape, which meant that this vintage gem could be restored to some of its previous beauty.
 |
| Melodium 42B repaired and re-ribboned |
The mic was stripped down and all the parts cleaned up in the ultrasonic bath. Then the magnets and some other bits were painted to stop the rust returning, and the motor reassembled. Dino (the owner) wanted to retain the vintage look of the mic, so the grills were straightened, de-rusted and then given some clear lacquer rather than being refinished. New grill cloth gives some protection against pops and wind blasts.

Then it was put back together and a new cable fitted with XLR output. And of course a new ribbon. The mic looks pretty damn cool!
Thanks to Dino Jakobsen of The Why Project.

The paint is just transparent enough to let a little of the grain show through. For a high gloss finish it should be given a few layers of clear lacquer, but I’m aiming for the less shiny look of budget 60s guitars so will probably leave it. The scratchplate is less than mint, and so a perfect body may look a bit incongruous. The replacement chrome control plate came from a Fender Jazz bass, adjusted slightly with a file to take off some pointy edges.

The extant screw holes in the body didn’t fit a standard neck plate, so I’ve used these ferrules and screws from StewMac. They work very well and solve the problem. Also, the original tremolo bridge was missing. I have replaced it with a used hardtail bridge from ebay (£6!), and machined a brass block to fill the hole where the vibrato spring must once have been. Perhaps that will give a little more sustain too.


The Oktava MK18 is the less well known, but more sophisticated older brother of the ubiquitous MK219, which is used and abused by hoards of mic-modders who love to chop and swap grills, capacitors and resistors.
 |
| Oktava MK18, front view with pattern switch |
In contrast to the cardioid-only 219, the MK18 is a dual diaphragm, multipattern condenser mic, with bass roll off (HPF), a -10dB pad, and pattern selector switches.
 |
| Oktava MK18 rear view with pad, HPF and rear capsule switch |
It also has a fourth switch with large and small cardioid symbols. This controls the ‘mix’ of the rear capsule, allowing the in-between patterns to be selected, to give hypercardioid and supercardioid response. Clever!
 |
| Oktava MK18 inside, front view showing components |
The switches are actuated by sprung bits of bent metal, and they make the mic very tricky to reassemble.
 |
| Oktava MK18 inside, rear view showing PCB traces |
The mic has that typical Oktava quirky build style, with etched PCBs and a small square can output transformer that looks different in size style from the ones in the MK219 and 319. The connector is a push-fit din plug!
Unfortunately this mic is designed to run with 60V rather than 48V phantom power. It will work with a normal phantom supply, but is currently giving erratically output, and may need some small modification to make it behave itself!
 |
| Stripping a badly painted guitar body |
Sanding didn’t work well on this so I used some general purpose paint stripper to remove the paint and start again. Beneath the white were traces of some original red paint.
 |
| Yuck! |
I have wanted a Nashville tuned guitar for some time, and saw an opportunity when I found a Jazzmaster / Jaguar style body and neck going cheap on a well know auction site. Time to put a guitar together! I’m calling this the Trashmaster (or Trashcaster?) as it is assembled from reused bits and pieces.
 |
| Hello Kitty? My pink guitar! |
The guitar parts arrived last week, and although the body and scratch plate looked in good shape, the neck was from a different instrument and played like a cricket bat! The body is a sort of vintage pink – not sure if I like it or not. Well, for £56 all in, one can’t complain too much.
I had a spare neck kicking around from last year’s Telemaster project, which played much better but didn’t quite fit in the body socket either. Judicial application of a plane, fret file and some abrasive paper quickly solved that problem!
 |
| Things almost fit together, but not quite! |
The scratch plate has two cut-outs for pickups and three switches, and covers most of the guitar’s routing. A metal plate from a Jazz bass covers the rest, and again this almost fits, and a hacksaw and file made some unwanted corners disappear.
The pickup holes are also slightly bigger than standard Strat or Tele single coils, and so custom pickups were made. This was pretty simple – using flatwork boards from StewMac, I cut out boards for the top and bottom of the bobbin, and drilled to make room for the magnets. This board is pretty useful stuff – it feels like cardboard but works like plastic. It drills easily and can even be turned on the lathe!
 |
| Custom pickups made in the Xaudia workshop |
The board was the glued to Alnico 5 magnets, and then the bobbin wound with 42AWG wire, and finished with string before potting in the wax bath. I put 9350 turns on the first pickup, but suffered a wire break about half way through making the second. Problems can often be turned into opportunities, and so in this case I ended up with a tapped 5000+5000 turn pickup for the neck. I have also been scatter-winding, so this should be interesting!
 |
| Wiring the guitar with scratch built pickups |
The switches on the scratch plate can thus be used for phase and coil tap duties. Try to be neat with the wiring!
 |
| Fender-looking Trashcaster, and Telemaster |
So, time to put the guitar for a bit together for a moment and see how it looks. Not too bad, but I’m not so sure I need a pink guitar in my life! More here….
The Fostex printed ribbons are rather odd microphones, using a membrane with a metal track suspended in a magnetic field to generate the signal. Although they have a natural figure of 8 response, their sound is more like a moving coil dynamic than a ‘true’ ribbon microphone.
This one was probably once used as a donor mic to fix a broken one – it arrived without a capsule assembly.
 |
| Fostex printed ribbon mic |
Sadly, Fostex UK were unable to supply a replacement part, so for now at least it has been converted into a Frankenphone ribbon mic.
 |
| Another Frankenphone! |
I used a spare ribbon frame from a Reslo mic, with a pair of small neodynium magnets glued to the frame, which gave a field of around 6000 Gauss (normal Reslos are around 4000 gauss). The new ribbon assembly fitted neatly into the old mount, needing just two strips of foam to hold it in place.
 |
| Fostex transformer and switch unit |
The Fostex transformer and filter switch were still present, but were designed for the Fostex printed ribbon capsule, and are unsuitable for a ‘real’ ribbon microphone. I wound a custom 1:34 transformer for the job, which works nicely. The mic has a full range output and sounds pretty good!
